Monthly Archives: April 2024

Putting on Airs: Tillandsias

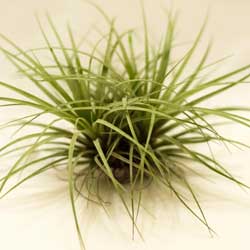
Looking for something easy to grow? Tillandsias should be on the top of your list. Tillandsia is the largest genus in the Bromeliad family with over 650 species that vary in color, size, texture and shape. In their native habitat, Tillandsias attach themselves to trees and rocks using their roots. They derive the nutrients and water they need from the air, hence the common name “air plant.” And like their name implies, no soil is necessary for a beautiful, thriving specimen! This versatile houseplant is not fussy, and when given minimal care, will adapt to most home and office environments.

About Tillandsias

Tillandsias are evergreen flowering perennials, and their native range spreads from the southeastern United States to Central and South America. While they are often associated with tropical regions, these diverse plants can also be found in deserts, high mountain ranges and rocky habitats.

It is a common misconception that these are rootless plants – in fact, their roots are critical to serve as anchors and keep the plants stable, though the roots do not absorb moisture or nutrition like other plants. Instead, these plants absorb all they need through their foliage.

Caring for Tillandsias

These delicate plants are easy to care for, but there are some tricks necessary to keep them healthy and looking their very best.

  • Light
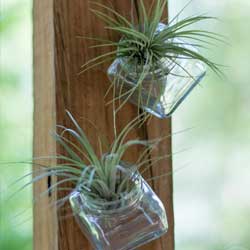
    Place your Tillandsias where they will receive plenty of light but not direct sunlight. Direct sun will dry out the leaves very quickly and can cause dehydration and wilting. Home or office fluorescent lighting works just fine.
  • Temperature
    Typical indoor temperatures are perfectly suitable for Tillandsias, and a range of 50-90 degrees Fahrenheit is ideal.
  • Water
    Once a month, soak your air plant in water for about 20 minutes. If the plant is flowering, a delicate rinse would be more appropriate so that the bloom is not damaged. When through soaking, shake off the excess water from the plant and place in an area with good air circulation so it can dry easily. In between soaks, spritz your Tillandsias 1-2 times per week with clean water from a spray bottle. Indoor heat and air conditioning rob moisture from the air. If your air plant leaves start to wrinkle or roll, this is a sign of dehydration. Give them a good soak and spritz more frequently.
  • Pruning
    It is not unusual for the outer leaves of an air plant to dry out and turn brown, and these spent leaves can simply be removed. If leaf tips dry a bit and turn brown, cut off the tip and continue with regular care. The plant will grow and look just fine.

One final note, Tillandsias have beautiful brilliant blooms but only bloom once in their lifetime. Depending on the species, the bloom may last several days to several months. Why not try several different Tillandsia varieties so you can experience these amazing blooms?

tillandsias_2tillandsias_1

A Feast for the Eyes

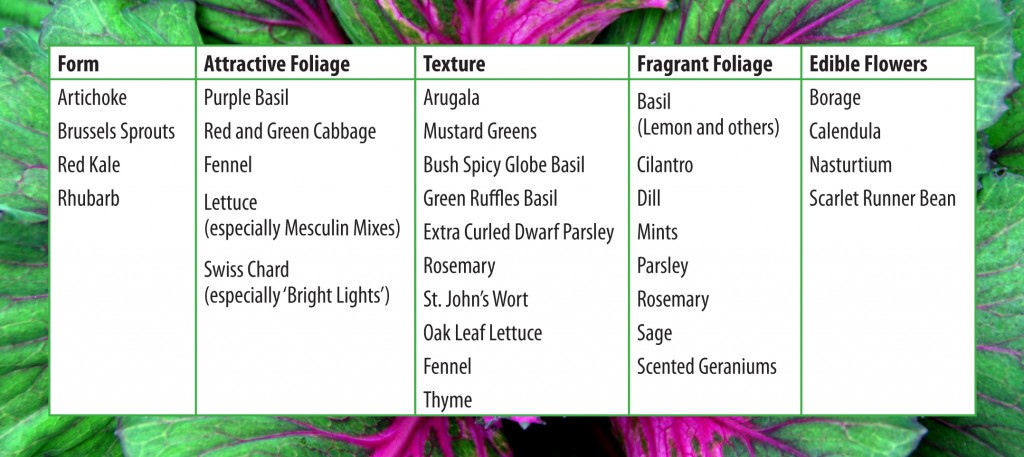
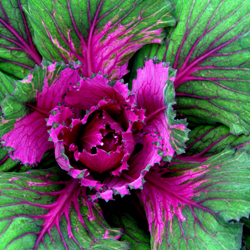
Traditionally, when planning a vegetable garden, the focus has been primarily on function with aesthetics as an afterthought – a productive harvest has usually been more important than any visual appeal. This year, why not try a new approach? Thoughtfully combine beauty and performance to create an edible garden that will explode with a variety of color and an abundance of produce. It can truly be a feast for the eyes as well as the table!

Planning a Beautiful Vegetable Garden

Color, texture and form are characteristics we keep in mind when combining plants in the flower garden. We plan flowerbeds so that plants enhance each other, repeating colors and shapes for continuity and flow. We add a variety of texture and form for diversity and interest. Vegetables, herbs and fruits can be just as vibrant, exciting, diverse and easy to combine as annual and perennial flowering plants are.

To begin, provide structure. Placing a picket fence around your garden offers instant structure and visually sets it apart from the rest of the landscape. If you plan on planting along the outside of the perimeter, you will create the allure of a garden within a garden, with a hint of secret places. Place a straight pathway through the center, starting at the entrance. Divide the larger garden into smaller square planting beds using pathways to separate the beds. This will enhance the structure of, and provide easy access to, the garden beds as well as lead your eye through the garden. If desired, you can also used raised beds for this formal structure.

Next, focus on plant selection. Begin with a plant plan or layout. Initially, base your selections on what is pleasing to your individual tastes. Consider unusual varieties of vegetables and herbs that come in unique colors. Repeat colors, both horizontally and vertically, to add depth and dimension to the garden. Don’t forget to add brightly flowering annuals such as zinnias and marigolds to mingle amongst the edibles. Another consideration is edible flowers like nasturtium and calendula. Contrast colors for a striking, eye-catching effect. Keep in mind, also, texture and form. Bold textures add drama and are often combined with fine-foliaged plants for a softening contrast. Short, stout plants anchor the garden bed while tall, willowy plants raise the eye and lead you farther down the garden path. Take all these characteristics into account when planning and place plants in geometric patterns to create a quilt-like garden tapestry.

Finally, your spring edible garden will emerge invoking a feeling of calm, displaying a variety of cool greens, purples and blues found in peas, lettuce, cabbage and broccoli. Shortly after, the summer edible garden will be completely transformed at harvest time with an explosion of vibrant shades of red, purple, orange and yellow. With so many stunning options to combine, you can truly create a feast for the eyes that will be beautiful in every season!

EdiblePlants-1024x457

Feast-2

Feast-3

Feast-1

More Than Just Mulch

Not only does mulch add a decorative finish to your flower beds, it also keeps the soil cool and moist and thus reduces the need for watering. By using a pre-emergent herbicide with mulch, weed seeds are discouraged from germinating and growing. But which mulch should you use?

Types of Mulch

There are several types of mulch to choose from, and each type can give your landscaping a different finishing touch.

  • Pine Bark and Nuggets
    These types of mulches release acid when they break down. Pine mulches should be used around plants that need a more acidic soil. Use around azaleas, rhododendron, pieris japonica and holly.
  • Shredded Hardwood
    This is by far the most popular mulch. It has a dark color and knits together well so that it does not wash away. This mulch is often available in different colors, including black, red and brown.
  • Cypress
    This long-lasting mulch has a pleasant fragrance. Cypress mulch also knits together well, and it is thought to repel insects.
  • Yard Waste
    Many gardeners use yard waste such as shredded leaves, grass clippings or pine needles as mulch. While these can be effective mulches to conserve moisture and repel weeds, and they are certainly more economical, they do not have the refined look of wood mulches. Yard waste mulches will also decay and discolor much more quickly than wood mulches.

Using Mulch

No matter which mulch you choose, it is important to use it properly. It is recommended that mulch be applied 2-3 inches deep around plants, in flowerbeds and in garden areas – less depth will not be as effective to shield and protect the soil, while deeper mulch may actually protect too much and could restrict water from entering the soil. Take care not to pile mulch directly next to stems and trunks, which could invite insects and rot to invade the plant.

Over time, mulches will decay and compact, at which time they can be removed and added to a compost pile, or simply turned and worked into the soil around the plants they’ve been protecting. To preserve mulch a bit longer, raking and turning it over will refresh its color and reduce compaction.

Not sure which mulch will be best for your plants? Our experts will be happy to help you choose!

mulch_1mulch_2

Spring Lawn Renovation

Spring is the ideal time to spruce up your lawn. After a long winter, you can easily see where any bald, bare or thin patches exist, as well as where weeds or fungus may be taking over the lawn. Fortunately, there are easy ways to set your lawn to rights!

Seeding

If you are planning to seed a new lawn or overseed an existing lawn, it is best to seed as early as possible. It is important to get seed germinated and growing before trees begin to leaf out, when the trees will be usurping more of the soil’s moisture and nutrition and new leaves will block sunlight from the grass seed. This is especially true in more heavily shaded areas. Keep the area moist at all times until the roots of grass seed become established, then you can gradually decrease the frequency of watering. The new grass can be mowed when it reaches a height of about three inches.

Rejuvenating a Weak Lawn

Your lawn cannot live without air, water and nutrients, but decaying material matted down between grass blades can smother even the healthiest-looking lawn. This decaying material is called thatch, and when a thick layer of thatch builds up, water and fertilizer may run off instead of penetrating the soil. Aerating and dethatching can help rejuvenate a lawn by restoring passageways to the soil. Late spring is an excellent time to dethatch cool-season grasses. Thatching rakes can be used, or you can use a metal rake to remove thatch by hand.

Adjusting pH

The pH of your soil has a direct impact on the health of your lawn. Test your soil to determine the pH (simple kits are available to do this). We recommend a small handful of soil taken from a depth of 3 inches to get the most accurate reading. At a pH of 6.4-7.0 nutrients are most readily available to turf grasses, and beneficial microorganisms are more active to decompose thatch and keep the soil structure healthy. If your pH is too low or too high, consider amending the soil as needed to help bring it to a more desirable level.

Crabgrass Control

On established lawns that you are not overseeding, apply a fertilizer with crabgrass control in early to mid-April like Fertilome Crabgrass Preventer Plus Lawn Food. Reapply in fall for the second germination of crabgrass. Remember, crabgrass seeds start to germinate when the soil temperature reaches 50-58 degrees.

Newly Seeded Lawns

On newly seeded lawns and those seeded in late fall or during the winter months, use a starter fertilizer like Fertilome New Lawn Starter Fertilizer to promote a strong root system.

Maintaining your lawn at a higher level, 4 inches, throughout the growing season will allow you to control crabgrass and broadleaf weeds without the use of chemicals. Taller grass will shade out the weed seed preventing germinating.

Insect Controls

An early season application of St. Gabriel Organics Milky Spore Granular Grub Control or Bayer Grub Control will provide effective white grub control for the growing season. This preventative method tends to give better results than applying insecticides when you notice damage as it then may be too late. If you have routinely had problems with other insects, opt for products specifically targeted for those pests to ensure effective control.

A lot goes into having a lush, healthy lawn, but if you take the appropriate steps to rejuvenate your lawn in spring, you’ll be rewarded with thick, healthy, resilient turf to enjoy from early spring until snow flies again.

spring_lawn_3

spring_lawn_1

Grass sprinkler

Protecting Our Pollinators

Every garden requires pollinators, and bees are among the finest. Without them there would be limited flowers and far fewer fruits and vegetables. Did you know that about 30 percent of the food we eat depends on the pollination of bees, including onions, cashews, coffee, carrots, chocolate and vanilla? If we don’t protect these prolific pollinators, our landscapes, gardens and diets will be irrevocably changed.

About Bees
Although there are many bees that are great pollinators, like carpenter, mining, sweat and cellophane bees, some of the most well known and easily identified bees are the honeybee and bumblebee. Both of these bees live in social colonies and are cavity nesters. Because these bees are active all summer long, they require a constant supply of floral nectar close to their hive and they thrive in flower gardens, orchards and other areas with abundant blooms.

Unfortunately, both these types of bees – along with many others – are disappearing rapidly, and two key threats are to blame.

  • Habitat Loss: As more natural habitat is lost to development, there are fewer nesting locations and inadequate food supplies for bees. While meadows developed into resorts and parks disappearing for strip malls are obvious examples of development, other less visible developments that can hurt bees include widespread use of flower cultivars that do not produce adequate nectar, eliminating critical bee food sources.
  • Pesticide Drift: Widespread, abundant spraying of pesticides to protect crops, lawns and parks can inadvertently hurt bees. Stronger pesticides can kill bees directly, while less potent toxins can contaminate nectar and will gradually build up to fatal levels in bees’ systems. Even if pesticides are not sprayed in areas where bees are abundant, high level spraying can easily be spread by wind patterns into critical bee habitats.

Inviting Bees to Your Garden
Fortunately, it is easy to bring more bees to your garden and encourage healthy bee populations. To support local bees…

  • Planting a variety of flowers that will bloom throughout the entire summer to provide ongoing food supplies.
  • Opt for native flower varieties that will be more easily recognized and used by bees, instead of introduced flowers that are less familiar.
  • Eliminate chemical use in your yard, as much as possible, including on your lawn, garden and trees, especially while plants are in flower.
  • Provide bees a safe place for shelter and to lay their eggs. A wood pile is suitable, or you can invest in a specialized bee house.
  • Make sure that there is an available water source for your bees. A bird bath or any simple water basin works just fine.

Want to bring bees to your yard and help them feel at home? Start with this list of native plants bees love, and ask our experts for more tips about keeping your lawn and garden bee-friendly!

Native Plants That Attract Bees

  • Apple (Malus)
  • Aster (Aster)
  • Blackberry & Raspberry (Rubis)
  • Black-Eyed Susan (Rudbeckia)
  • Blueberries (Vaccinium)
  • Currant (Ribes)
  • Elder (Sambucus)
  • Goldenrod (Solidago)
  • Highbush Cranberry (Viburnum)
  • Joe-Pye Weed (Eupatorium)
  • Penstemon (Penstemon)
  • Purple Coneflower (Echinacea)
  • Redbud (Cercis)
  • Rhododendron (Rhododendron)
  • Sage (Salvia)
  • Stonecrop (Sedum)
  • Sunflower (Helianthus)
  • Willow (Salix)

bee_2
bee_3
bee_1