Monthly Archives: January 2022

Creating and Maintaining a Terrarium

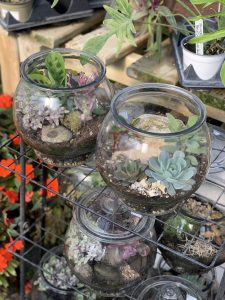
Terrariums – Creating and Maintaining

Choose an open container that will fit your needs, and choose plants that are compatible in lighting, watering, and humidity needs. Your plant foundation will consist of four layers:

  1. Bottom Layer (Drainage) – pebbles, pea gravel, or very coarse sand.
  2. On top of Bottom Layer – spread a thin layer of activated charcoal to help clean the air of the fumes caused when the organic materials begin to decompose
  3. Third Layer – thin cover of sphagnum moss spread over first two layers, This prevents the soil from sifting into the drainage layer.
  4. Final Layer – Potting Mix with one part course sand added – increase sand if creating a desert type terrarium garden. (Do not use beach sand.)

Inspect plants you are using for signs of insects or disease, or any other potential problem. Choose plants of varying height, shape, texture and color to create the desired landscape effect. Will the garden be viewed from all sides? If so, larger plants should be planted in the middle, with lower plants around it. If the terrarium will be viewed from one side, then the tallest plant should be placed in the back, with lower plants in the foreground. Experiment placement by moving in their containers until placement is confirmed. Remove plant from its pot, and place in a pre dug hole, Unlike planting in the garden, it is not necessary to loosen the plant’s roots. In a terrarium, you don’t want the plants to grow too quickly, and leaving the root ball compacted will slow the growth.

Firm the soil gently around the roots. Do not crowd the plants or place them directly against the sides of the container. Allow sufficient space for them to grow and spread. After planting, the soil should be slightly moistened. Never allow the soil to be soggy unless you are growing “bog” plants. A lid should then be placed on the terrarium (You may have to use your imagination to find the appropriate lid.)

Check the terrarium frequently for the appearance of condensation on the glass. If large water drops appear on the glass, the container should be left open for a while until any excess moisture evaporates. In some cases, it may be necessary to keep the lid slightly opened to allow for fresh air circulation. A balanced terrarium should have a certain amount of moisture on the glass. A completely enclosed terrarium requires little or no watering. If it is not totally enclosed, you may have to water on a weekly or monthly basis (more often for open terrariums or dish gardens).

The addition of water becomes necessary if no condensation accumulates on the glass. When water is eventually needed, it should be added a small amount at a time, since there is no place for the surplus water to run off. (Overwatering quickly increases the danger of fungus or mold.) Check again the next day, and if no condensation has appeared, more water may be added. When in doubt, always water less, but watch carefully so that the plants do not become too dry and wilt.

Generally, terrariums should not need fertilizing, but if the plants start to appear malnourished, you may feed them all-purpose houseplant food at ¼ strength. Occasionally, it may become necessary to prune or replace a dead plant. Diseased plants should be removed immediately.

A focal point may be added to your terrarium landscape, such as a rock or stick to simulate boulders or logs or a small statue as part of the garden.

5 Reasons to Start Seeds Indoors

5 Reasons to Start Seeds Indoors

  • You’ll save money – seeds are less expensive than plants.
  • You can choose from an almost endless variety of heirloom and commercially bred seeds.
  • You’ll enjoy vegetables earlier in the season.
  • It’s a fun project to do with your kids!
  • Nothing beats the joy of watching a seed grow and the sense of accomplishment when you harvest your own food.

11 Tips to Seed Starting Success

Start seeds 4 to 6 weeks before you plant in the garden. Cool season crops like broccoli or lettuce can go into the garden before the last frost. Warm season crops like tomatoes and peppers should not be planted until all danger of frost is past. Almost anyone can succeed by following the guidelines below.

  1. Fresh is best. Start with fresh, high quality seeds each year.
  2. Plastic is fantastic. You can purchase plastic trays and kits designed specifically for starting seeds. They’re clean and free of pathogens, they keep soil uniformly moist and allow for adequate drainage.
  3. Use a magical mix. Good mixes, like Espoma Organic Seed Starter, ensure that you’ve got a lightweight, clean and sterile medium without insects, fungus or weeds. Moisten the mix with a little water (damp, not soggy).
  4. Packets know best. Plant your seeds according to the depth and spacing directions on the seed packet. Cover the seeds with soil mix and tamp down to ensure that the seeds are held in firm contact with the soil.
  5. Bottom’s up. It can be challenging to apply the right amount of water to freshly sown seeds by pouring, sprinkling or spraying. It’s better to water from the bottom. That means placing the planting container into a larger pan of shallow water for a short time (few seconds to a couple of minutes).
  6. Take cover. Loosely cover with plastic wrap after watering to retain moisture. Check the moisture daily and watch for germination. As soon as the seeds germinate, remove the plastic wrap
  7. Stay warm. For most seeds, sprouting requires a minimum temperature of about 65° to 75°F. If the ambient temperature is less than that, you can use a heating pad or position a space heater nearby. Just make sure the soil doesn’t dry out.
  8. Let the sun shine in. Most seeds need about 12 to 16 hours of sunlight each day. Place your set containers in a sunny location such as a window with southern exposure. Once the seeds sprout, turn the container a little each day. This will prevent seedlings from overreaching in one direction toward the light.
  9. The need to feed. Don’t use fertilizer on seedlings until they have sprouted! In the very early growth stage, the seed provides its own nourishment, but once leaves develop, it’s time for a little fertilizer like Espoma Plant-tone.
  10. Harden them off. Your sheltered seedlings need to get ready for the outdoors. For 7 to 10 days, put your plants outside for a few hours each day, increasing their exposure to sunlight & wind. Cut back on watering a bit, too. Your plants will be hearty and better prepared for transplanting
  11. No stripping. Slowly, gently remove plants from their containers without stripping the roots naked or tearing them. Plant them in the ground and mix in a really good starter plant food like Bio-tone Starter Plus in with the soil.

Now that the plants are safely in the ground, there’s just one last step. Give yourself a big pat on the back for a job well done-and look forward to enjoying the fruits (or flowers and veggies) of your labor later in the season.