Monthly Archives: February 2025

Kokedama: Easy How-To Instructions

Are you a gardener with a minimalist vibe? Well then, kokedama will give you all the right feels!

What is Kokedama?

Kokedama, loosely translated as “ball of moss,” has become a popular trend in recent years, and for good reason. This Japanese art form eliminates planting pot use by wrapping moss around the root ball to create a beautifully minimalist plant display. If you’re interested in adding some greenery to your home and are looking for a space-saving option, then kokedama is for you.

One reason for kokedama’s recent surge in popularity is its practicality. Unlike traditional potted plants, kokedama is versatile and can be either hung in the home or placed in a saucer or bowl atop a table, shelf, mantle, windowsill, or other surface. Hanging as a display option is perfect for those with limited space. Additionally, kokedama is an enjoyable, easy, and unique way to create a stunning display that can last for years with just a little bit of maintenance. Also, it is an excellent winter gardening project that is fun for the whole family.

Materials

Before you start your kokedama, you’ll want to gather your materials, and it’s important to choose the right ones.

  • Plants
    Most small houseplants will do. We recommend African violet, anthurium, begonia, cyclamen, dracaena, ferns, peperomia, philodendron, pilea, and pothos as great beginner plants. Ease of care is important when selecting your plant, but more importantly, consider where you have the room to display your kokedama. You will want your chosen plant to be displayed where its light, temperature, and humidity needs are met.
  • Moss
    Select sheet moss, either fresh or dried.
  • Soil
    Any good quality potting soil will do. Potting soil with a bit of compost for nutrition and vermiculite for aeration is an extra good choice.
  • String
    It is best to avoid using jute or cotton string. These are attractive with a natural look but break down rather quickly compared to waxed string or fishing line.
  • Incidentals
    Scissors are the only tool necessary to cut the moss and string.

How To Construct

Once you have your materials, it’s time to get kokedama construction.

  1. Premoisten the soil just enough so that it maintains its shape when it is formed into a ball.
  2. Gently remove the selected plant from its pot, shake off excess soil, and mold the moist potting soil ball around the plant roots.
  3. Lay an adequate-sized piece of sheet moss flat and place the soil ball in the middle.
  4. Shroud the soil ball in moss, trimming away any extra.
  5. While holding the moss in place, tie a string loop around the soil ball.
  6. Continue to wrap the string around the ball, tugging as you go to keep it taunt until the moss is secured to the ball. Tie off the line and cut away the excess.
  7. Add a tripod of long strings, as long as you like, and evenly spaced around the ball. Tie them to the line that is wrapped around the moss ball.
  8. Gather the three strings at the top and balance the kodedama so it hangs correctly. You may eliminate this and the following steps if you choose to display it in a saucer or bowl.
  9. Fold the three strings down about three inches and knot them to create a hanger.
  10. Hang your kodedama and enjoy!

After Care

Familiarizing yourself with your chosen kokedama plant will assist you greatly in caring for it correctly. Depending on the type of plant you choose, you’ll want to make sure that all its needs are met.

  • Water
    Water as needed. Check every few days or so by sticking a finger through the moss to assess dryness. Water using a bowl, soak the ball thoroughly, and squeeze out all the excess water before rehanging.
  • Light
    Provide adequate light for your selected plant and position accordingly.
  • Humidity
    Humidity is necessary for all plants, but some more than others. Be sure to have a spray bottle filled with fresh water nearby. Mist your kokedama frequently, especially in the winter when the air indoors is particularly dry.
  • Feed
    Fertilize your kokedama during the growing season with a water-soluble houseplant fertilizer. Use at a quarter strength in the soaking water. Follow the manufacturer’s recommended instructions for frequency.
  • Groom
    Groom your kokedama as necessary, snipping off any browning bit and keeping vining plants in bounds.

In conclusion, kokedama is an easy and trendy way to bring some greenery into your life. With a little time and a few basic supplies, you can create beautiful, pot-less, hanging plant displays that will impress your friends and family.

Note: Succulents may be used for kokedama, requiring more light than most plants but less water, humidity, and fertilizer.

Kokedama
Kokedama
Kokedama

Creating Humidity for Houseplant Health

Have your houseplants been looking dingy and dry no matter how much you may water them? Have they lost the lustrous glow their foliage first had when you got them? Poor humidity may be the cause. Many of our houseplants hail from the tropics and grow in humidity of 50-80 percent, considerably more humid than typical homes. The trick is to know your plant’s preferences and be able satisfy it. Putting a cactus in the shower will cause it to rot, while a fern is perfectly happy.

But what can you do if you really want that fern in the family room where the humidity may only be 20 percent in the winter? If your plant has brown leaf tips or margins it probably needs more humidity and is asking you to increase it. Luckily, it’s easier to add humidity than it is to take it away.

Easy Ways to Increase Humidity

There are several ways you can easily increase the humidity around your houseplants. If they only need the air a little more humid, just one technique may be sufficient, but if they are humidity-loving plants, you may want to try several options at once to really give them a humidity boost.

  • Pebble Tray
    Place an inch of small pebbles, marbles, shells or gravel in a 2″ deep tray, half fill the tray with water and set your plant on the pebbles. Don’t set the pot in the water, as the wicking action will saturate the pot soil and could lead to rotting roots and overwatering. As the water in the tray evaporates, it increases the humidity immediately around the plant. When you water the plant, pour out the water from the tray to prevent mineral buildup, algae and insect growth.
  • Plant Grouping
    Rather than spacing plants throughout the room, group them together to take advantage of the moisture each plant produces through transpiration. Grouping plants can increase humidity by as much as 15 percent. Place the entire group on a pebble tray if additional humidity is required. Allow air circulation between the plants by ensuring the plants are not touching each other, and rotate individual plants periodically to encourage straight growth and distribute humidity absorption.
  • Misting
    Use a misting bottle daily to increase humidity and cleanse leaf pores, which tend to clog with dust. However, to prevent leaf rot, do not mist plants with “velvety” leaves such as African violets. Do not over-mist plants to the point where their leaves are dripping wet, or else they may suffer from overwatering.
  • Humidifiers
    Available in a variety of sizes, humidifiers increase the humidity in a larger space. You may also find yourself breathing better when using a humidifier. Our houses become very dry in the winter because of furnaces, heat pumps and fireplaces, and humidifiers can not only help houseplants, but can also help alleviate dry skin, limp hair, chapped lips and hacking coughs.
  • Terrariums
    If your house is just too dry for the plants you would like to grow, try planting them in a terrarium. These nearly enclosed vessels create miniature environments perfect for humidity-loving tropical plants such as ferns, orchids and mosses. You will still need to water your terrarium, but because much of the moisture is trapped, the humidity in the enclosure is much higher.

Keeping your humidity-loving houseplants happy in the winter isn’t difficult. Come in and see us to ask questions, get answers and pick up the simple supplies to make your home a houseplant haven.

Humidity

Insects In Winter

Now that we’re in the throes of winter, do you ever stop and think, “Where did all the bugs of summer go?”

With the onslaught of frigid temperatures along with snow and ice, gardeners and homeowners alike hope and pray that these weather extremes will reduce local pest insect populations. But do they?

Well, there’s both good news and not-so-good news on this subject. For some insects, life ends when the cold begins; that’s the good news (well, maybe – read along for more on this). However, insects are known survivors, so for others, over time, they have developed methods of survival; that’s the not-so-good news.

The Good (well, maybe)

Let’s begin with the good news. Some insects die when the cold weather sets in. The only problem with this “good news” is that they have already taken steps to continue their legacy before they expire. Knowing that the end is near, these insects lay their eggs beforehand, ensuring a new generation come spring. If the eggs are laid above ground, there is a greater chance that they will not make it through a particularly harsh winter – this would include insects like bagworms whose egg casings hang from evergreen trees and shrubs where they are offered little protection from the elements. It also includes the red lanternfly, whose egg masses will not survive temperatures below 12 degrees Fahrenheit.

The Bad

As stated earlier in this article, many insects have developed a method for winter survival. Here are some of their tricks:

  • Migration – Just like some birds, some insects migrate to warmer areas to survive the cold.
  • Hibernation – Some insects have the capability of slowing their metabolism, just like a bear, to withstand wild winters.
  • Freeze Tolerance – A few insects that naturally come from areas with harsh winters have developed the ability to create a natural anti-freeze in their bodies to prevent ice from forming, thus ensuring their winter survival.
  • Freeze Avoidance – Still, other bugs simply avoid the bad weather. This is by far the most popular method of insect winter survival. These pests will bury deep into the soil, disappear into rotting logs and leaf piles, or slink into our homes for warmth and comfort.

The Reality

The reality is that you can’t count on winter to make a big difference in yearly pest control, even when the winter is extreme. It is far more effective to have several approaches in place to create an effective pest defense strategy.

  • Familiarize yourself with local pests and their lifecycles. As always, knowledge is power.
  • Make sure you know the difference between a “good” and a “bad” bug before attempting to eliminate them.
  • Monitor your home and garden regularly for pest infestations to gain the upper hand on any potential pest problem.
  • Stop by YOUR GARDEN CENTER for insect identification and the safest treatment recommendations, such as natural repellents, pest management tactics, companion plant suggestions, and beneficial insects.

Insects in Winter
Insects in Winter
Insects in Winter

Don’t Miss Out on Brunnera macrophylla ‘Jack Frost’

Are you trying to add drama and beauty to your shady spots but keep finding only bland, lackluster plants? You won’t want to overlook Brunnera macrophylla ‘Jack Frost’ with its stunning appearance and easy care.

Introducing Brunnera macrophylla

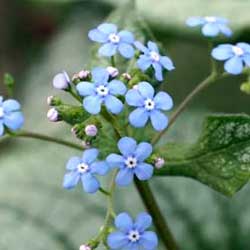
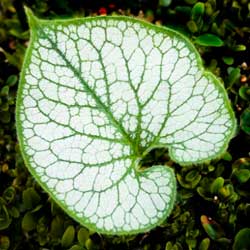
Also called Brunnera-Heartleaf and Siberian bugloss, this plant is a stunner for its delicate foliage. The broad, heart-shaped leaves of ‘Jack Frost’ are dark green with a heavily frosted metallic silver overlay. This allows only the green veining to peep through, giving the plant a crackle-like finish with a thin green border. Sprays of tiny bright blue forget-me-not like flowers burst forth in mid- to late spring, growing well above the foliage on delicate stems.

Using Jack Frost in the Landscape

Excellent in a woodland garden, the genus Brunnera is a group of classic perennials valued as a shade tolerant ground cover. The variegated forms are slower to spread than most other species, making this cultivar ideal for smaller spaces where crowding may be a concern, such as around younger trees, in smaller beds or in borders along a shady fence, deck or pathway. This plant is fabulous as a specimen plant or may be massed to show off its phenomenal floral display. ‘Jack Frost’ would also make a wonderful addition to a shady container garden on a deep porch or covered deck. The flowers are long lasting when cut and can be lovely, delicate additions to arrangements. Because this plant is resistant to deer and rabbits, it can also be a favorite in wildlife-friendly areas.

Proper Care is Key

Brunnera is a woodland plant, and that must be kept in mind if it will be able to show off its full potential in your landscape. ‘Jack Frost’ should be grown in full shade and consistently moist soil in southern regions to mimic the thicket-like conditions it naturally favors. In the north, morning sun is acceptable as long as the soil remains moist and the temperatures in the sun do not rise too high. Although tolerant of many soil types, this plant will grow best rich soil. If needed, amend soil with lush compost to improve its condition and provide proper nourishment. Little care is needed once Brunnera is established. Cut back the old foliage in the spring rather than in the fall; it will help to protect the crown during the winter. A winter mulch is also recommended to help keep the soil moist and warmer to protect the roots.

Brunnera macrophylla ‘Jack Frost’ may not be widely known, but once you meet it, you’ll want to invite it to every shady part of your landscape!

Brunnera
Brunnera