Monthly Archives: November 2025

Outdoor Ornamentation

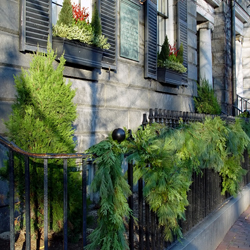
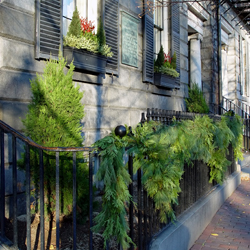
Do you miss the vibrancy of your flowerbeds and the rich, lush colors of your landscape once winter sets in? With warm weather pots, window boxes and hanging baskets already in place, decorating the outside of your house this winter will be a cinch!

  1. Use only containers that are winter safe. Porous pots, like terra cotta, are not a good choice as they tend to crack when they freeze. Better choices include frost proof pots, concrete urns, fiberglass or foam containers and cocoa-lined wire hanging baskets. For a truly holiday look, consider containers that may have red-and-green coloration or other holiday hues, or look for whimsical holiday-themed designs.
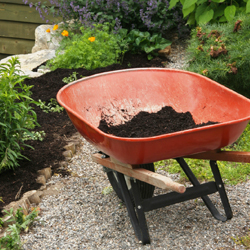
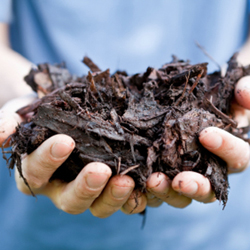
  2. Use the soil that is already in your containers. Remove just the tops from your previous plantings, allowing their roots to remain in the soil as an anchor for your winter arrangement. We also suggest mixing with play sand to allow water to reach the cuttings. You may also need some plant or gardening pins to help keep your arrangement in place and secure.
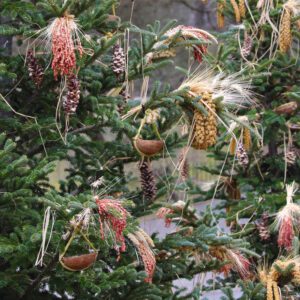
  3. Begin by adding greens to your container (note: your greens will last longer if soaked in Bonide Wilt-Stop for 24 hours before using). Cut branches to the desired length. Create a dense base for your arrangement using either cedar, pine or spruce. Consider allowing some boughs to trail over the edge of the arrangement for more visual interest, or mix up different types of greens for interesting texture.
  4. Create a focal point for your arrangement with the addition of a few tall branches of curly willow, red twig dogwood or white painted birch. Position these taller elements near the back of the arrangement to allow more room for additional plants and decorative items. To add more magic to the arrangement, consider painting taller branches gold or silver.
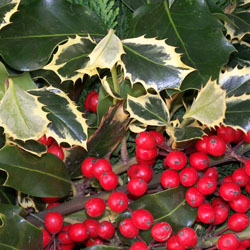
  5. To include additional color and texture, incorporate more winter-themed plants into the arrangement. Holly, incense cedar, winterberry, or juniper are all top choices. Go for a lush, tiered look with at least five differing textures for the best effect.
  6. To bring your arrangement to life add mini white or colored lights, desired ornaments and weather-proof ribbon. For a more whimsical look, consider garlands, candy canes, cranberry strings or even a fairy gingerbread house. Remove these when the holiday season ends and leave the arrangement intact until time for spring planting.
  7. You might spruce up around the pot to bring even more notice to your arrangement. Consider a ribbon around the pot, or add light-up gift boxes or wrapped boxes around the pot to create a larger focus.

With just a few steps, the outdoor containers you enjoy in spring, summer and fall can continue to be lovely accents for holiday and winter decoration. Stop in to pick up a festive new pot, evergreen bundles and Wilt-Proof for your porch pot project!

Get Started Composting

Fall is an excellent time to start a compost pile with all of the leaves falling, and if you develop compost now, you will have a rich source of organic material for your garden and flowerbeds in spring. Getting started with compost is fairly simple if you keep in mind the following…

  • Size Matters
    Smaller particles break down faster than larger chunks. Shredding or mulching garden wastes will help speed up the process and develop usable compost faster. Chop up larger pieces of household materials before adding them to your compost pile to speed up their decomposition.
  • Take a Turn for the Better
    Turning helps aerate the pile and shifts outer parts closer to the center where they can heat and decompose more effectively. A well-mixed pile will also have better consistency and more evenly distributed nutrients. Use a pitchfork, spade or rake to gently turn your pile periodically, such as once every 1-2 weeks or whenever you add a large amount of new material to the pile.
  • Know What to Compost
    Materials that can be composted are sod, grass clippings, leaves, hay, straw, manure, chopped corncobs, corn stalks, sawdust, shredded newspaper, wood ashes, hedge clippings and many kinds of plant refuse from the garden. Some household waste, such as coffee grounds, banana peels, eggshells and vegetable peelings are also ideal for a compost pile and will reduce the trash you accumulate.
  • Avoid Unwanted Materials
    Materials to avoid composting are large amounts of weeds, grease, fat, meat scraps and bones, cheese, coal ashes, diseased plants, cut weeds and charcoal. These materials do not decompose readily and can create poor quality compost. For example, meat, grease or dairy products in your compost will begin to smell strongly, which could attract rats, raccoons or other unwanted visitors. Diseased plants or weeds can survive in a compost pile, contaminating your garden when you add the compost to the soil in spring.
  • Cover as Needed
    Covering your compost pile with a tarp or large piece of carpet can help preserve the heat and moisture essential to promote appropriate decomposition. The cover can also keep the pile from freezing or getting too wet in winter conditions, and it can easily be removed to add new material or turn the pile as needed.

Before you toss out your next bag of trash, check for compost material and start your pile today! Your garden will thank you tomorrow.

Christmas Fairy Gardens

Let the magic of miniature fairy gardens give you the Christmas you’ve always wanted. You can create the garden and entry of your dreams without breaking the bank, redoing your landscaping or remodeling your home!

Are you feeling nostalgic for a Victorian Christmas? Create your own Christmas outdoor scene. Start with a shallow container and choose a Victorian house. Then, from our exciting assortment of diminutive plants, miniature pots and small-but-realistic lawn ornaments, create your own holiday front yard, walkway, porch and entrance. Use tiny containers to flank the doors, a decorated dwarf conifer as an outdoor Christmas tree, ribbons over the windows and colored sand or mini-pavers along the pathway. You can even add a decorated doghouse, shed, or teensy wrought iron table under a gazebo.

Maybe a white picketed seashore cottage is your dream. Create it in miniature! Add a rustic mailbox, vine twig furniture and a tiny surfboard in the sandy surface and you can almost hear the ocean. Twinkling LED lights add a festive touch, or opt for a tiny palm tree strung with holiday ornaments.

Perhaps you’re an apartment dweller, dreaming of having your own veggie garden. Assemble a miniature garden with realistic tiny vegetables, tool shed and tools. Add a wishing well, a wheelbarrow and scarecrow. Put in a chicken coop with tiny chickens. Your friends will be looking for Peter Rabbit! For a winter touch, add a fun snowman to the scene.

Maybe you’re not looking for something for yourself. Are you seeking a unique hostess gift? Consider planting a tiny Japanese garden with a moon bridge arching over a pond stocked with koi. A simple miniature garden with a few personalized items your host will love such as a lawn swing, bicycle, or fairy hiding in a small bush is sure to bring a smile to their face.

Give the gift of time by constructing a miniature garden with a child or shut-in. A shared miniature garden is an ongoing fun project, and you can rearrange the garden and create new scenes with very visit or for every season. Create a wonderful opportunity to share stories and imaginative fun while fostering a love of gardening.

Stocked with a huge assortment of miniature and fairy garden accessories, our gift shop offers everything you need to make your Christmas miniature garden. If you need visual ideas, our bookshelves are stocked with beautifully illustrated books chock full of mini-decorating and gardening ideas. Come on in and get ideas, choose your items and make your Christmas dreams come true.  Check out the new product that just arrived!

Getting Your Trees and Shrubs Ready For Winter

Winter wind and sun are responsible for much of the injuries your landscaping plants will sustain over the winter. The elements are especially hard on broadleaf evergreens such as rhododendrons, hollies, mountain laurel and boxwood. Being evergreen, these plants are constantly losing moisture through their leaves, but since the ground is frozen, the water in the soil is unavailable and they cannot replenish their supply. Drying winter winds and bright, reflecting sun only serve to compound the problem. Fortunately, there are a number of ways to prevent this.

  1. Make certain that the plants have plenty of water before the ground freezes as a plant in a water deficit situation is much more prone to winter injury. Keep watering plants until the first freeze, but water slowly so the ground is not saturated which would lead to ice heave and root damage.
  2. A heavy mulch of shredded bark or leaves, pine needles or straw can be spread around the plant to a depth of 3-5 inches. This will help preserve moisture in the soil and keep the soil warmer so delicate roots are not as easily damaged by ice and frost.
  3. Use Wilt Stop, an anti-transpirant spray, that will protect plants from environmental stress like windburn and winter damage.
  4. To reduce the effects of the winds, wrap shrubs with burlap or other breathable fabric. This not only breaks the force of the wind, but also shades the plants from sun. Do not, however, wrap plants in plastic or tarps that would restrict air flow completely, or the plants may smother. Another option is to use Wilt-Pruf. It is sprayed on the plant to reduce the loss of moisture caused by wind and sun.
  5. Remember, younger plants, saplings and newly planted shrubs are more subject to winter damage so take special care of these. Plant as early as possible so they have more time to get established before winter sets in, and keep a close eye on them to minimize any storm damage through the season.
  6. After a heavy storm, inspect your trees and shrubs for damage. If boughs or branches have broken, prune them away immediately so they do not continue to tear and cause more injury to the plant. Use a soft broom to brush off a heavy accumulation of snow if needed, but do not try to melt away any accumulated ice or frost, as the temperature change can damage the plants.

With good preparation and conscientious care, your trees and shrubs can withstand even the cruelest of winter cold and storms, and they’ll be bursting into new spring growth before you know it.

Bird Feeding Basics

Winter is the perfect time to think about attracting bird visitors to your yard. Bird watching is a great hobby that can be enjoyed by both younger and older members of the family and getting started is both easy and inexpensive.

Bird Feeders

The type of bird feeders you select will depend on where you want to observe your feathered friends, as well as the kinds of foods you are offering and the types of birds you want to attract.

Hanging feeders, suitable for smaller birds, can be hung from a tree, pole or hook. Platform feeders can be mounted on a pole/post, deck railing or fence, or even just set on the ground. There are also window feeders that can be mounted directly to a window for enjoyment close at hand plus suet feeders or cages which hold suet cakes – a must for attracting insect-eating woodpeckers and nuthatches.

Feeders should be located in a sheltered place where they are not exposed to strong winds or vulnerable to attack from predators such as hawks and cats. Try grouping several different feeders together to attract the maximum number of different birds. All feeders should be kept clean and in good repair.

Bird Seeds

Just like us, birds have certain food preferences. Black oil sunflower seed is one of the most popular seeds, attracting a large variety of different birds. Some seeds such as Nyjer (thistle) are very specific – if you want to attract colorful goldfinches, then this one is for you. Mixes containing sunflower, thistle, cracked corn, millet and other seeds are also available, to tempt many bird visitors. Larger birds that feed on the ground, such as doves, quail and wild turkeys, will love cracked corn.

Natural Food Sources

If you are serious about attracting birds to your yard throughout the year, then think about planting trees, shrubs, perennials and even annuals that will provide natural foods at different times. Birds love berry-producers such as crabapples, hollies, hawthorns and viburnums. Perennial favorites for seed eaters include members of the black-eyed susan family (Rudbeckia), coneflowers (Echinacea), goldenrod (Solidago) and coreopsis. Seed heads of ornamental grasses are also highly sought after. Of the annuals, sunflower (of course!), marigolds and cosmos are popular. Just be sure to leave seed heads on the plants so birds can take advantage of them.

Don’t Forget Water!

Water for bathing and drinking is one of the basic requirements for all birds, even for species that won’t visit feeders. If you already have a bird bath, be sure to keep it filled with clear, fresh water. A bird bath heater will keep water available even during freezing weather. A mister, dripper or bubbler will move the water around and attract even more birds with sparkling splashes.

From feeders and seeds to plants and water sources, we have everything you need to get started attracting birds. Come on in today and you’ll be able to enjoy your feathered friends this fall and winter!

Care of Christmas Greens

Fresh cut greens – pine boughs, holly sprigs, mistletoe, etc. – are wonderful for winter and holiday décor, both indoors and out. Extend the life and enjoyment of your fresh greens by following these easy steps:

  • SOAK – Immerse greens in cold water overnight or up to 24 hours. The needles will soak up moisture to stay plump and firm. A good location for accomplishing this task is in a utility sink or bath tub, but be sure the water won’t freeze while the greens are soaking. Use only fresh, plain water without any additives or chemicals.
  • DRY – Allow greens to drip dry for an hour or so in a well-ventilated area out of direct sunlight. This will remove excess water from the branch ends so they do not leak.
  • SPRAY – If desired, spray Wilt-Stop, an anti-transpirant, on greens when they are finished dripping. This will seal moisture into the needles extending the life of your greens. Do not use this on Princess Pine, and note that this product may change the color of blue-colored cut greens like Colorado Blue Spruce and Blue Juniper. Test the spray on an inconspicuous area first to be sure you don’t mind any changes.
  • DRY – Allow the greens to dry thoroughly after spraying and before decorating and hanging or arranging. This will be sure there are no water spots on any of your bows, accent pieces or ornaments that are part of your fresh arrangements.
  • COOL – Keep greens in as cool a location as possible, out of direct sunlight and away from any heat source, including heating vents, ceiling fans and air ducts. Moving arrangements of fresh greens onto a cool porch or into a garage each night can help extend their vibrancy.
  • BUNDLE – Arrange your fresh greens in dense bundles and bunches, either as wreaths, vase arrangements or swags. As a group, they will help keep each other fresh with slightly higher humidity between each green.
  • CLEAN – Keep fresh greens crisp and clean through the holiday season by dusting them lightly. Use only a clean, lint-free cloth without any sprays or chemicals. This will remove dust that may dim the arrangements, but chemicals could damage the greens or change their colors. Do not brush the greens so harshly that you may damage or dislodge their needles, foliage or berries.

With proper care, your fresh cut greens can be stunning holiday decorations for several days or weeks, bringing a touch of nature into your home even when the world is cased in ice and snow.

Holiday Staycation

No matter the reason, staying at home during the holidays doesn’t have to be a disappointment. Instead, a holiday staycation can be a true celebration of home and family, creating new traditions and making memories to enjoy all year round.

Benefits of Staying Home for the Holidays

It is normal to be disappointed if you’re accustomed to holiday travel but decide to stay at home instead. A positive attitude, however, can make all the difference for an enjoyable and festive holiday season. There are many benefits to staying home, including saving money, no travel stress, no need to pack, no crowds at airports, more time to relax, and ease of changing your plans for whatever strikes your festive fancy. When you stay home, you can sleep in or stay up late without worrying about missing a tour or activity, and you can be more flexible with all your seasonal fun. This is especially important, as you will soon discover there is so much to do, your holiday staycation – “holistay” – will be just as entertaining and enriching as any far-flung destination.

Ideas for Your Holiday Staycation

There are many fun and festive options to enjoy at home for a happy holistay, using your landscape, lawn, and garden to add to the excitement. Whether you choose just one activity as a focal point of your holiday or plan different options every day, you can make great memories and enjoy time with all your loved ones.

  • Decorate a Tree for Birds and Wildlife
    Invite your local wildlife to the holiday festivities with a deliciously decorated tree. Use softened suet or peanut butter to coat pinecones and roll them in seed for feeder ornaments or use fishing line or sturdy thread to create cranberry and popcorn strings as edible garlands. Use floral wire or ribbons to hold twigs into star or tree shapes for extra beauty on the tree, and fasten small ribbons or burlap bows to the tips of branches to catch birds’ eyes and attract them to the bounty.
  • Create Elaborate Snow Sculptures
    Go beyond snowmen when you use your whole yard as a canvas for an epic snow sculpture. You might create a giant figure or an intricate scene and using a variety of handheld garden tools can help you sculpt details with ease. A wheelbarrow or buckets will be necessary to haul extra snow from other parts of the yard to enhance your sculpture, and sturdy wire or garden stakes can help provide internal support for taller features.
  • Enjoy a Gourmet S’mores Night
    Clean off your firepit and get ready for holiday decadence with a gourmet s’mores night. Choose different graham crackers or other cookies for a base and opt for different chocolate bars – dark chocolate raspberry, white chocolate peppermint, sea salt, caramel, etc. – to experiment with rich and delicious flavors.
  • Host a Neighborhood Bonfire
    Create a larger festive gathering with a neighborhood bonfire in a portable fire pit in your driveway or front yard (safely, of course!). Consider a potluck-style gathering with everyone bringing their favorite holiday treats or provide hot drinks for everyone to enjoy. Outdoor games such as cornhole can easily be added to the fun for a bit of friendly competition.
  • Create Garden Gifts
    Give your crafty side a workout and make garden-inspired gifts for family members, friends, and neighbors. Dip pinecones in scented wax for festive fire starters or use clear glass or plastic ornaments to showcase a pine sprig, miniature pinecones, or dried flowers. Pine prunings can make beautiful homemade wreaths and swags, or river rocks can be painted into festive row markers or decorative accents.
  • Blend Homemade Potpourri
    Bring natural air fresheners into your holiday home with garden potpourri. A variety of plants can be dried for amazing scents, including lavender, lemon balm, rose buds, mint, pine, lemon verbena, rosemary, yarrow, geraniums, zinnias, and sage. Add dried apple or orange slices for a sweet accent, and a few drops of essential oil to enhance aromas. Give your homemade dried or simmering potpourris as gifts when wrapped in burlap and tied with ribbon or fill a clay pot or tin pail for a rustic diffuser.
  • Decorate a North Pole Fairy Garden
    Create Santa’s Workshop in a fairy garden with accessories from the garden center. A broken clay pot can easily be the base, and you can paint it white, red, green, or a combination of festive shades. Use sand and potting soil as the base to keep the garden from tipping and add miniature holiday décor to create a wonderland to enjoy.
  • Build a Natural Gingerbread House
    Instead of cookies that go stale and candy that falls off, use pieces of cardboard and natural decorations to create a faux gingerbread house with rustic accents such as pinecones, pine needles, acorns, twigs, dried flowers, and other garden-inspired beauty. Get the kids involved with creative decorations and create an entire village or nativity scene of natural beauty to decorate a large dining room table or mantle.
  • Make Soaps and Candles
    Add garden accents to luxurious gifts when you make homemade soaps or candles with garden-fresh herbs, dried flowers, pine needle and berry sprigs, or other great decorations. You can pour your own soaps and candles using holiday-themed cookie cutters or candy molds, or you can simply soften premade soaps and candles to press your garden accents into the surface for instant customization. Wrap the gift with jute twine or rustic ribbon and your gift is ready!
  • Plan a Holiday Scavenger Hunt
    Create a themed list of items to find and offer prizes for the winners in an at-home holiday scavenger hunt. You could include items from the landscape and garden, holiday decorations from around the neighborhood, or more widespread objects around your town. If you want to keep the hunt in your garden, colorful plastic pots or tin buckets are great for collecting all the items on the list – a sprig of berries, a funny-shaped rock, a piece of pine, etc.
  • Get Started With Indoor Gardening
    Even if the weather outside is frightful, you can have a delightful time with indoor holiday gardening. Pot amaryllis bulbs, paperwhites, or Christmas cacti to use as seasonal decorations or gifts or consider starting a savory herb garden to flavor soups, stews, gravies, roasts, and other meals all winter long. You can even add a tropical touch to your indoor landscaping with a potted lemon tree, palm, or other greenhouse favorites.
  • Take a Class
    Investigate winter classes hosted by your local arboretum, botanical garden, or our garden center. Classes may be online or in person. Many popular winter options may be available, such as garden-inspired crafts, wreath making, winterizing your landscape, how to start an indoor herb garden, terrarium-making classes, painting clay pots, or overviews on succulents, bulbs, seed starting, and other fun and informative topics. Some may be geared to children, some for adults, and some may be fun for the entire family.
  • Get Inspired
    Another day out can be just visiting a local garden center, botanical garden, or even walking around the neighborhood or a local park to get inspired for your own garden and landscape. Look for plants that offer winter interest or different arrangements, accents, and accessories that can be great to feature in your own yard. If you can’t identify the plants, take pictures so you can seek identification help from our garden center experts.
  • Plan for Spring
    Let your imagination sprout when you plan your spring garden during a holiday staycation. Gather books and magazines, visit a range of websites, and draw out the landscape plan of your dreams. Work in different colors adding plants to showcase during different seasons. Include wildlife-friendly features and practical details such as how to creatively store your garden tools, hoses, and other necessities to make your garden great. You can even start buying seeds, new tools, and accessories to be ready to go as soon as spring begins.
  • Create Epic Holiday Decorations
    Since you will be home during the holidays, make the most of your outdoor holiday decorating with an epic lighting scheme or themed display. Get creative by using plant stakes and tomato cages to create faux trees and supports for more elaborate light displays and add a welcoming accent with a holiday-themed porch pot or living wreath to greet any holiday guests.

There is a great deal you can do to make the most of a holistay, no matter why you may be staying home for the holidays or what your garden and landscape offer. By embracing what your home offers and getting creative with your holiday activities, you can make many amazing holiday staycation memories.


Precious Pollinator Bulbs

Did you know that spring blooming bulbs are vital to our precious pollinators’ health and even their existence?

After a long winter of hive hibernation and diminishing food reserves, honeybees will set out on warm, early-spring days seeking nectar and pollen to feed their hungry colony. It’s not only crucial that they have plenty of food early on but throughout the entire season as well.  Colorful flowers attract honeybees; however, they do have favorite colors and are most charmed by shades of blue and purple. 

We’ve put together a list of the best fall-planted bulbs that bloom in a variety of alluring colors to entice and nourish our precious spring pollinators.  Tulips (Tulipa) and Daffodils (Narcissus) should be included in this list of important pollinator plants, and both of these offer several selections that will bloom in early, mid, and late spring.

Early Spring

  • Crocus (Crocus)
  • Glory of the Snow (Chionodoxa)
  • Iris (Iris reticulata)
  • Siberian Squill (Scilla)
  • Snowdrops (Galanthus)
  • Wood Anemone (Anemone)

Mid Spring

  • Chequered Lily (Fritillaria)
  • Grape Hyacinth (Muscari)

Late Spring

  • Ornamental Onions (Allium)
  • Spanish Bluebells (Hyacinthoides)

BULBS: EASY TO GROW

Because they require very little care and maintenance, bulbs are ideal for the busy gardener that wishes to protect our pollinators. There are just three simple steps to a lovely and lively spring bulb garden. 

  1. Dig: Dig the hole of an appropriate depth for the bulb size. The general rule of thumb: plant at the depth or three times the height of the bulb. 
  2. Drop: Drop the bulb in the hole, covering it firmly with soil and a layer of mulch if desired.
  3. Done: That’s it – the bulb will do the rest with the nutrients it has stored. Just be sure it has water at the appropriate time, and the blooms will amaze you.

All About Amaryllis

A bold, flowering bulb, amaryllis is popular for its winter blooming habit and makes a colorful indoor plant as well as a great gift for anyone with a green thumb. But how much do you really know about these familiar flowers?

What Is Amaryllis?

These plants are part of the flowering bulb genus Hippeastrum, which is native to South America, Central America, Mexico and the Caribbean in tropical and subtropical regions. It must be noted that the familiar amaryllis can easily be confused with the genus Amaryllis, which is actually native to southern Africa and is most successful only when grown outdoors. Hippeastrum flowers, on the other hand, thrive indoors and are widely sold as gifts and houseplants in the winter months.

Hippeastrum bulbs range from 2-5 inches in diameter and are relatively fleshy. Each bulb will produce several spear-like, stiff leaves that can reach 12-20 inches long. Along with the foliage, each bulb can produce 1-2 long stems that will yield 2-12 trumpet-shaped flowers with large, triangular petals. The bloom colors range from white, red, orange, salmon, pink and peach to deeper hues of burgundy and purple. Variegated and striped blooms are also popular.

Blooms may last for several weeks, and the foliage can persist long after the blooms die.

Potting and Caring for Amaryllis

Unpotted, dormant bulbs should be stored in a cool (55 degrees Fahrenheit), dark, dry location. Before planting, the bulbs should be brought to room temperature, and the roots can be lightly rehydrated in lukewarm water for an hour or two before planting, but the base of the bulb itself should be kept dry to minimize the risk of rot. While these bulbs will bloom in water – they’re often sold in clear, decorative vases with the roots reaching into water and pebbles used as a planting medium – they will do better when properly planted, which will also encourage reblooming.

The best pot for a single amaryllis bulb will be just an inch wider than the bulb’s diameter, or several bulbs can be planted together in a larger pot for a more dramatic display. Because these flowers grow so tall, however, the pot should be heavy enough to support their size. If necessary, adding several rocks or a layer of gravel to the bottom of the pot before planting will help balance the weight to keep the arrangement stable, and a deeper pot will also provide adequate room for root growth. It may also be necessary to add a stake to support the tall flower stems, but be sure not to damage the bulb when adding a stake to the pot.

Rich potting soil is essential for the best amaryllis blooms, as these bulbs grow vigorously and require adequate nutrition to reach their full potential. When planting a bulb, it should be submerged in the soil up to its neck, but leaving the top quarter of the bulb uncovered. The soil should be tamped firmly to support the bulb. Place the pot in a warm, sunny spot when foliage emerges, and rotate the pot daily as the plant grows taller to ensure straight, upright growth that will better support heavy flowers.

Gently water the bulb until the first stems appear, but take care not to overwater the pot or the bulb and roots may rot. As the plant grows taller and the blooms emerge, more watering will be needed to keep it adequately moisturized.

It may take 7-12 weeks for an amaryllis to bloom, depending on the type and size of bulb, its growing conditions and the care it receives. Larger bulbs that produce more flowers will generally take longer to bloom, while smaller bulbs will have shorter flowers but will bloom more quickly.

After the Bloom

Because these plants are popular every holiday season, many people discard amaryllis bulbs after they have stopped blooming. It is possible, however, to encourage reblooming with the proper care.

After the flowers have faded, deadhead the blooms but leave the foliage intact. Sharp flower-pruning shears are best to avoid tearing the stem or causing it to bend or break. Your Amaryllis should be placed in the sunniest spot available, continue to water as necessary and monthly feeding should ensue. This will encourage leaf production which with photosynthesize adding nourishment to the bulb enabling it to produce flowers again next winter. Move the plant outside once all danger of frost has passed to a sunny location. Continue to water and begin fertilizing every other week.

If you want to control when your amaryllis blooms again, you will need to encourage the bulb to go dormant. This is done by stopping fertilization, allowing the soil to gradually dry out, and reducing sunlight and temperature so leaf production slows and eventually stops. The dormant period will generally last 8-10 weeks, so, if you would like your Amaryllis to bloom for Christmas, mid-August is the time to begin this process. When leaves brown naturally, cut them back, remove the bulb from the dry soil, wrap it in newspaper and store it at around 55 degrees Fahrenheit for 8 to 10 weeks. After this dormant period, repot the bulb in fresh soil and begin watering again. The bulb will start to produce leaves and flowers won’t be far behind. With the proper conditions and care, you can keep your amaryllis blooming for years to come.

Amaryllis flowers are attractive and bold, perfect for brightening any indoor landscape during a cold and dreary winter. By understanding these flowers and their needs, you can provide them with proper care to ensure they always look their best.


Forcing Bulbs for the Holidays and Beyond

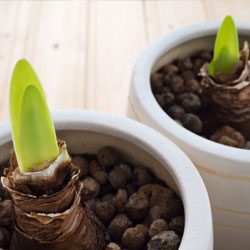
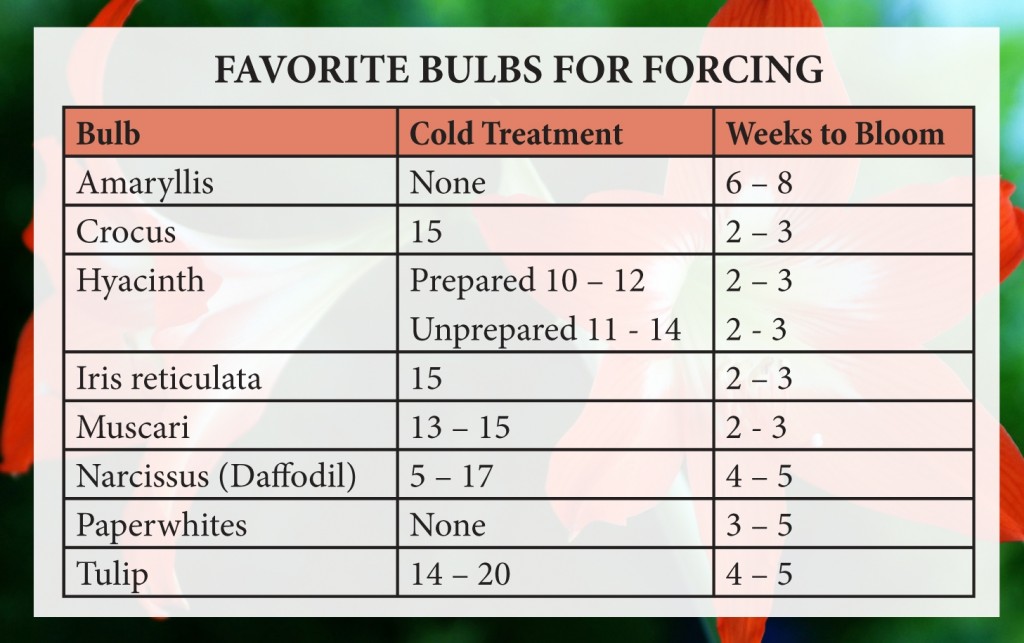
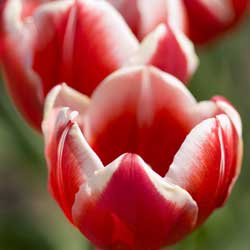
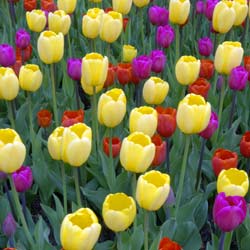
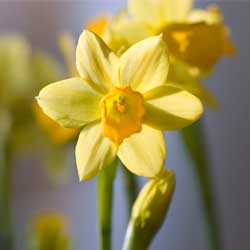
Blooming baskets and pots of brightly colored forced bulbs make a fabulous holiday or winter gift for others and ourselves. What better way to dress up the holiday home or cheer up a long, cold winter, reminding us of impending spring?

The forcing process should begin in September or early October if you want the bulbs to be blooming when given in late November or December. If you are starting late, no worries, just print these easy instructions to give with your potted bulbs and let the recipient do the rest.

Forcing Bulbs in 10 Easy Steps

  1. Count backwards from the desired bloom date the number of weeks required for bloom plus the number of weeks required for cooling. This is the planting date. To use your forced bulbs as a blooming Christmas gift, you will have to plant in September.
  2. Select a container that has drainage holes and is at least twice as tall as the unplanted bulb. There is an exception for paperwhites that you plan to grow in stone. These should be placed in a container without drainage holes.
  3. Mix a good bulb fertilizer into your potting soil according to directions on the package.
  4. Fill enough of your container with potting soil so that when the bulb is placed on top of the soil the tip of the bulb sits slightly above the lip.
  5. Place your bulbs on top of the soil. Keep them close without touching each other or the container.
  6. Continue to fill the area between the bulbs with soil. Fill until slightly below the lip.
  7. Water the soil gently, allowing excess to drain.
  8. Refrigerate potted bulbs for the appropriate amount of time. Check frequently and water as necessary to keep the soil moist.
  9. Gradually acclimate planted bulbs to a warm, bright location when their required cooling time has been completed. Move back out of direct sun and into a cooler location when the bulbs finally flower to prolong the blooms.
  10.  Rotate container frequently to produce straight stems.

Post Bloom

After flowering, cut back flower stems and place your containers back in full sun. Continue to water until the foliage dies back naturally. When the foliage is completely spent, place containers in a cool, dry place until early next fall when the bulbs may be safely planted into the garden. Forced bulbs cannot be forced a second time. Paperwhites will never bloom again and should be discarded after forcing. Previously forced bulbs, after planting in the ground, may skip a year’s bloom but will eventually return to their former beauty and regular schedule.