Author Archives: Dammann's Garden Center

The Fall Herb Garden

The end of the summer doesn’t mean the end of deliciousness from your garden, not when a fall herb garden can add tantalizing tastes to all your meals. As the season changes, give your herbs a little tender loving care to ensure that they thrive through fall and into winter.

Caring for Perennial Herbs

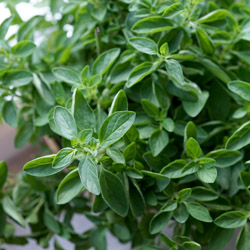
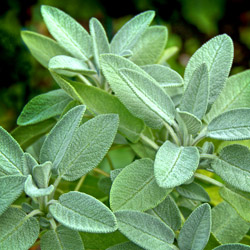
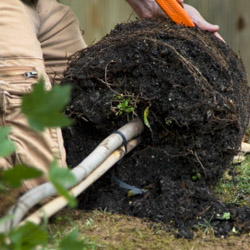
Perennial herbs that are already established in the garden can easily be winterized, including mint, oregano, thyme, chives, rosemary and sage. So long as the herbs are healthy and thriving as summer wanes, they can be prepared for winter.

First, stop fertilizing herbs in August so they do not continue to produce delicate new growth. Continue to water them adequately, however, as drought stress will make the plants less able to tolerate winter. As their growth slows, trim each plant carefully, using sharp, clean shears for crisp cuts that will minimize strain on the plant. Prune herbs to 4-6 inches in height. It is a good idea to add a layer of mulch to insulate plant roots in colder climates.

Planting Herbs in Autumn

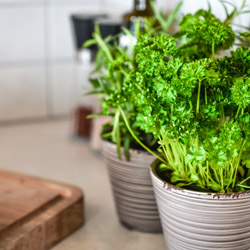
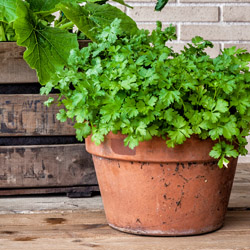
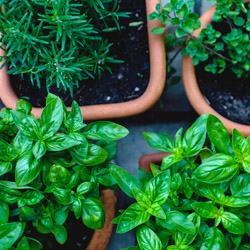
Cool-weather herbs, annual or perennial, can easily be planted in autumn and will be ready to flavor many savory dishes. A container herb garden is an ideal choice for fall herbs since it can be easily moved and protected for the best care. Choose a container with suitable size and depth to nurture the desired herbs, and ensure it has adequate drainage holes to promote good drainage.

Planting several herbs in the same pot will save space and keep them all close by for easy use. You may also consider using smaller pots that can be grouped together in an attractive arrangement. Pots can be positioned right near the kitchen or patio door for easy access, or in a sunny window box.

Protecting Herbs in Winter

Annual herbs or newly planted perennial ones can be at risk if a hard freeze or unexpected storm arrives. Staying alert to weather forecasts and keeping a keen eye on the barometer will help you protect your herb garden as the season deepens. If the temperature is dropping, it is best to shelter your herbs with sturdy covers, cold frames, or cloches. Moving pots or containers temporarily into an insulated garage and near an interior wall that will be warmer can also protect them from cold snaps.

If container herb gardens can safely remain outdoors in the late fall, the pots should be elevated so their drainage holes do not become clogged. Pot feet or plant stands are great options and will help keep the soil from becoming too damp after repeated rains or snows.

Trimming plants into dome shapes is another way to protect the fall herb garden from the onslaught of winter weather. A more compact shape will shed rain and snow more effectively, providing better protection for the plant’s structure and minimizing damage. A dome shape will also be easier to cover if necessary.

Dishes for a Delicious Fall

Fresh herbs add subtle flavors to salads and can be used to season roasts and meats. Infusing soups, sauces, and gravies is another way to create layers of flavor in autumn foods, and herbs can even add unique notes to hot teas, fruit compotes and jellies, or spiced cider. The better you protect your fall herbs, the more you will be able to enjoy them throughout the season and well into winter.

Fall Herb Garden

Fall Herb Garden

Fall Herb Garden

Fall Herb Garden

Fall Herb Garden

Autumn: Why Plant Now?

Although many gardeners plant trees and shrubs in the spring, knowledgeable gardeners plant in the fall to take advantage of all this fabulous season has to offer. But why is fall planting better than spring planting?

  • Stress Reduction
    Transplanting causes stress as plants are removed from containers, balls or established locations and changed to new locations. Planting in the fall, when a plant is entering dormancy and is generally hardier and sturdier, reduces this stress so the plant can thrive.
  • Establishing Strong Roots
    Fall planting “establishes” trees and shrubs by encouraging root growth. Because the soil is still warm, the roots continue to develop until freezing, though the upper parts of the plant are already dormant. When transplanting in the spring, the developed roots are active and delicate tips or rootlets, as well as buds and new leaves, are more easily damaged.
  • Weather Resiliency
    Trees and shrubs planted in the fall are better able to withstand the rigors of the next summer’s heat and dry conditions because they have much longer to develop healthy roots systems and become thoroughly established. This is especially critical in dry climates or areas prone to drought or irregular rainfall.
  • Faster Maturity
    The “head-start” of fall planting results in a larger plant in less time, helping create a mature landscape without waiting for smaller plants to catch up. This can be especially critical when replacing dead or damaged plants in a mature landscape to avoid a gap or uneven look.
  • Water Conservation
    Planting in the fall saves watering time and promotes conservation by eliminating daily watering. Cooler temperatures with the addition of both morning and evening dew contribute greatly to soil moisture availability in fall without as much supplemental watering.
  • Color Confirmation
    Fall is the best time to see a plant’s autumnal color. Planting in the fall eliminates the surprise of the wrong color or unexpected shades that may not coordinate with nearby plants. By planting in autumn, you’ll know exactly what you’re purchasing and planting, and you will be able to match better with your existing landscape.

Autumn can be the ideal time to plant trees and shrubs, whether you are adding to your landscape, replacing plants or starting a whole new look. If you plant in autumn, you’ll be amazed at how lovely your landscape will look next spring.

Gardener planting a tree by positioning its root ball into soil
Tree trunk surrounded by vibrant fall chrysanthemums in bloom

Audition Some Autumn Bloomers

Extend the beauty of your garden with vivid autumn-blooming perennials. When you think of fall-blooming plants, don’t stop at mums – there are many perennials that can add color to your yard at this time of year.

Top Autumn Bloomers

While there are different autumn-blooming perennials for different growing zones and climate conditions, some of the most popular and widespread options include…

  • Fall Daisies
    For fall daisies (besides daisy mums!) grow Boltonia or Nippon Daisy. Boltonia is a tall (3-4′) grower, suitable as a background plant. White or pink daisies are borne in profusion atop fine grey-green foliage. The Nippon Daisy (Chrysanthemum nipponicum) is covered with large crisp white daisies in October. Both love lots of sun and make excellent cut flowers.
  • Autumn Sedums
    Bold-foliaged sedums provide texture as well as color in a sunny place. Sedum ‘Autumn Joy’ is the most well known. It has coppery-pink flower heads. Sedums ‘Brilliant’ and ‘Stardust’, with soft pink and white flowers respectively, are also attractive. For a totally different color combination plant sedum ‘Vera Jameson’. It has gray-purple foliage with rose pink blooms and looks stunning when planted with Blue Fescue, Artemesia Silver Mound and other silver-foliaged plants. As an added bonus, all the sedums are attractive to butterflies.
  • Autumn Asters
    Asters are another fall bloomer that butterflies love. These perennials like sun and moist, well-drained soil. There are many colorful aster varieties in shades of pink, purple, blue and white. Some favorites include tall-growing aster ‘Alma Potschke’ with bright pink flowers, blue-flowered aster ‘Professor Kippenburg’ and low-growing aster ‘Purple Dome’ with its deep purple blooms.
  • Autumn Goldenrod
    Sunny yellow goldenrod (Solidago) is another bright addition to the fall garden. Wrongly blamed as the cause of fall allergy problems, goldenrod has rightly taken its place in the fall garden. It looks particularly effective combined with blue flowering plumbago, purple asters and ornamental grasses.

Fall Bloomers for Shade Gardens

Even shade gardeners can enjoy late blooming perennials. Tall growing Japanese Anemones are a stately addition to the perennial garden. Bloom colors range from pure white to various shades of pink, and flowers can be single, semi-double or double blooms. Anemones grow well in light to moderate shade and spread quickly to form large clumps, filling in space vacated by spent summer plants. Turtlehead (Chelone) is another fast spreader for shade. Rose pink flowers cover the tops of the plant from early September to October. For a deeply shaded location, try Toad Lily (Tricyrtis), which has clusters of beautiful cream flowers, spotted with maroon along its upright stems. For light shade, plant Blue Cardinal Flower (Lobelia siphilitica), whose intense blue spikes can be admired from mid-August until frost.

No matter what type of garden you have, the end of summer does not need to mean the end of colorful blooms. Instead, just opt for amazing fall bloomers and enjoy brilliant color even longer!

Audition Autumn Bloomers

Audition Autumn Bloomers

Audition Autumn Bloomers

Fall in Love with Fall Pansies

Ideal for fall gardens, pansies offer a colorful display for almost six months – in the fall when they are planted, in the winter during a stretch of sunny days and again in spring! Winter pansies may be planted anytime starting in mid-September and continuing through October. Multiple plantings spaced a week or two apart can also ensure even more blooms to enjoy throughout otherwise drab months.

Planting Pansies

As with any plant, pansies perform better if the soil that you place them in is well prepared. Choose a planting location that is well-drained and work in 4-6 inches of rich organic matter, such as garden compost, peat moss or Bumper Crop. Plant pansies at about the same level, or slightly higher, than they were growing in their market packs or containers, taking care not to plant too deep or the plants may wilt and rot and the roots could smother. After planting, mulch and water the bed thoroughly. Remember to check the plants often during the first three weeks after planting or until new growth begins, to ensure adequate moisture necessary for healthy growth. Because these plants require very little care, no other maintenance is usually necessary for them to reach their full potential.

Where to Plant Pansies

These versatile blooms can be used in many different parts of your garden or landscape. Add a graceful drift of single-colored pansies or a mass of mixed colors to brighten a border, under a tree or along a fence, pathway, deck or wall. Try tucking single plants in garden beds around perennials and shrubs that have finished blooming to brighten up an otherwise dreary section of the landscape and to help mask older, spent growth. Pansies also do well in containers placed on a deck or patio or next to the entrance of your home to greet your guests with welcoming color. Try pansies in a hanging basket and you can even move them indoors to enjoy when the weather is too poor for outdoor gardening. A small container of fall pansies can also be a great gift for winter holidays, birthdays or just to brighten the day of anyone who could use a touch of color in their life.

With so much color to enjoy in so many ways, fall and winter pansies should be a staple of any garden and will bring great gardening joy to the landscape even during colder, dreary months.

Fall Pansies

Fall Pansies

Fall Pansies

Surviving the Summer Heat

Even when it is sweltering outside, the garden will still require your care. Gardening in extreme temperatures has the potential to become a serious health risk if we are not careful. Understanding the potential heat-related problems and knowing how to protect yourself can ensure that your gardening remains a safe place this summer. Here are some common heat-related issues gardeners might face and tips on preventing and recovering from them.

Common Heat-Related Problems

  • Heat Exhaustion
    • Symptoms: Heavy sweating, weakness, cold, pale and clammy skin, fast and weak pulse, nausea or vomiting, and fainting.
    • Prevention: Stay hydrated, take frequent breaks in the shade, wear lightweight and light-colored clothing, and avoid gardening during the hottest parts of the day.
    • Recovery: Move to a cooler environment, lie down, and elevate your legs. Drink cool water and apply cool, wet cloths to your skin.
  • Heat Stroke
    • Symptoms: High body temperature (above 103°F), hot, red, dry or damp skin, rapid and strong pulse, headache, dizziness, nausea, confusion, and unconsciousness.
    • Prevention: This is similar to preventing heat exhaustion but emphasizes recognizing the signs early. If you experience symptoms, seek immediate medical attention.
    • Recovery: This is a medical emergency. Call 911 immediately. While waiting for medical help, try to cool the person down with whatever means are available – cold packs, a cool bath, or wet cloths.
  • Dehydration
    • Symptoms: Thirst, dry mouth, dark-colored urine, fatigue, dizziness, and confusion.
    • Prevention: Drink water consistently, not just when you feel thirsty. Aim for at least 8 ounces every 20 minutes during intense activity.
    • Recovery: Drink water or sports drinks that replace lost electrolytes. Avoid sugary, caffeinated, and alcoholic beverages, as they can exacerbate dehydration.
  • Sunburn
    • Symptoms: Red, painful, and warm skin, blistering in severe cases.
    • Prevention: Sunburn is often not felt until it is too late. Take precautions. Apply a broad-spectrum sunscreen with at least SPF 30, reapply every two hours, and wear a wide-brimmed hat and long sleeves if possible.
    • Recovery: Apply aloe vera or a soothing lotion to the affected areas. Cool baths and over-the-counter pain relief can also help. Avoid further sun exposure until the skin has healed. Seek medical advice if the burn is extreme and you are experiencing fever, chills, and nausea.
  • Heat Rash
    • Symptoms: Red clusters of pimples or small blisters, usually in areas where clothing causes friction.
    • Prevention: Keep the skin cool and dry, wear loose-fitting clothing, and try to avoid heavy sweating.
    • Recovery: Keep the affected area dry and cool. Use powder to soothe the rash and avoid using ointments or creams that can trap heat in the skin.

Self-Protection Strategies

  • Hydration: Always keep a water bottle within reach. Avoid beverages that dehydrate, such as alcohol and caffeine.
  • Appropriate Clothing: Light-colored, loose-fitting clothes made of natural fibers like cotton help keep your body cool. A wide-brimmed hat and UV-blocking sunglasses are also crucial.
  • Timing Your Work: Plan your gardening activities early in the morning or late in the afternoon when temperatures are lower.
  • Shady Spots: Set up shaded areas where you can take breaks. Umbrellas or portable canopies can provide instant relief from direct sunlight.
  • Pace Yourself: Don’t try to accomplish too much at once. Break your tasks into smaller, manageable chunks, and rest frequently.
  • Sunscreen: Apply generously to all exposed skin 15 minutes before going outside and reapply every two hours or more often if you’re sweating heavily.

Gardening, or all outdoor work in high temperatures, requires awareness and preparation. Recognizing the signs of heat-related issues and taking proactive steps to protect yourself, you can enjoy your garden safely, even in the hottest weather. Stay hydrated, take breaks, and listen to your body to ensure that your gardening remains a source of joy, not a cause for concern.

Surviving Summer Heat

Surviving Summer Heat

Surviving Summer Heat

Butterfly Bush

What could be more enjoyable than relaxing in your favorite lawn chair or hammock, your sunglasses on and a cool beverage in hand, staring at an enchanting array of colorful butterflies milling around their favorite plant? What could possibly be an easier way to accomplish this vision than by planting a simple butterfly bush?

About Butterfly Bush

Buddleia davidii, the butterfly bush, is a flowering maniac. It pushes its proliferation of perfumed blooms straight through summer and well into fall, providing nourishment to butterflies all season long. Available in a multitude of colors ranging from white to pink to red to purple, there are colorful butterfly bushes to match any garden or landscape color scheme. The fragrant, long, spiked panicles are borne in profusion on long, gracefully arching branches that add drama and elegance to the yard. And it really is a butterfly magnet!

Growing Butterfly Bush

This quick growing, deciduous, woody shrub is winter hardy in zones 5-10. In the northernmost areas of its hardiness range, Buddleia behaves like a herbaceous perennial, dying back to the ground in very cold winters. In the southernmost areas, Buddleia is grown as large shrub and can flourish all year. In either location, however, you should treat this plant as a cut back shrub. Because butterfly bush blooms on new wood, it benefits the plant to be cut back to the ground each spring. This judicious pruning will stimulate lavish new growth and an abundance of flowers. It will also keep some of the larger varieties at a manageable size, particularly in smaller yards, corners or other confined spaces.

Plant your butterfly bush in full sun in just about any type of soil and it will thrive. Don’t worry about fertilizing as over-fertilization can encourage too much leaf growth over flower formation. Deadheading will encourage additional growth and new flower buds to extend the blooming season. Buddleia has a good tolerance for drought once established, but should be carefully watered when young. A good, thick layer of mulch will help maintain soil moisture and keep weeds down to keep the shrub healthy. Just be sure not to use insecticides or pesticides on your butterfly bush or you may be harming the very fluttering fliers you hope to attract.


Fabulous Hydrangeas for Show-Stopping Summer Color

Hydrangeas and are widely acclaimed for their large, showy blossoms that lend fabulous color to gardens from mid- to late summer. Their luxuriant dark green foliage offers a striking background to their large round or smooth blossoms. All hydrangeas are deciduous, and it’s a sure sign of spring when their tender green leaves begin to appear. Hydrangeas are spectacular when grown as single specimens and are equally fabulous when planted in mixed shrub borders. Some of our favorites…

  • Bobo Panicle Hydrangea: Loads of white flowers on a tiny plant. 3′ x 3′
  • Little Lime Panicle Hydrangea: A dwarf form of the Limelight. 5′ x 5′
  • Quick Fire Panicle Hydrangea: Pure white flowers turn pink; then dark rosy-pink in the
    fall. 3-5′ x 3-5′
  • Endless Summer Bloomstruck Hydrangea: Color range of jewel tones from rich, clear
    pink to glorious purple to royal blue. 3-4′ x 4-5′
  • Oakleaf Hydrangea – An upright, irregular shrub that grows 4-6’ tall. Large leaves have excellent fall color. Creamy white flowers in July. Tolerates shade well.
  • Bigleaf (macrophylla) Hydrangea – Blue or pink flower clusters (5-10” across) appear in August. Flower color depends on the pH of the soil. Acid soils produce blue flowers, whereas alkaline soils produce pink blossoms. In garden settings, their colors can be changed by adding either sulfur or lime, depending on the color you want to achieve. Blossoms are produced on last year’s growth, so prune just after blooming.
  • Many Other Popular Varieties Available

Mopheads and Lacecaps – Which is Which?

Before you get the urge to dash out and buy the first hydrangeas that catch your eye, it’s wise to learn the difference between “mopheads” and “lacecaps.” As peculiar as these names sound, they truly are the names designated to two cultivar groups of macrophylla hydrangeas, and understanding the difference between them can help you choose the flowers you prefer.

  • Mopheads
    Garden hydrangeas, also known as ‘mopheads,’ feature large round flowerheads resembling pom-poms and bloom from mid- to late summer. Mopheads bloom in solid masses, their clusters often so heavy that they cause their stems to droop and bend with elegant arches.
  • Lacecaps
    Lacecap hydrangeas bear flat round flowerheads with centers of fertile flowers surrounded by outer rings of sterile flowers. The fascinating flowerheads of lacecap hydrangeas are also somewhat reminiscent of pinwheels.

You will be delighted with the versatility of these lovely shrubs, so relax and enjoy their beauty!


Best Fruits for the Urban Garden

With the right plant picks, you can grow a bountiful feast of fruit in your urban garden. From your favorite fruit trees to succulent vines to bushes bursting with berry goodness, your urban garden can be  highly productive, supplying delicious fruit for your nourishment and enjoyment.

What Fruits Need

Fruit-bearing plants need well-drained, loamy soil, adequate water for appropriate juiciness, and abundant sunlight for rich, productive growth. It can be a challenge to meet those needs in an urban environment, but your space may offer more resources than you realize. Study how sunlight moves through your garden space, including how shaded and sun-drenched areas change over time so you can best plan which plants to position for the best growth. Choose good quality potting soil if you’re planting in window boxes, pots, or containers, or amend your natural soil with appropriate compost and add the correct fertilizer to nourish hungry plants. Be prepared to water your plants adequately, particularly if natural rainfall isn’t enough for the plants’ needs. Regardless of the size of your garden space, you can meet fruits’ needs for a delicious and abundant harvest.

Best Fruits for Urban Gardening

The best fruits for urban gardens are those that keep compact shapes and adapt well to smaller spaces. They are also flexible with their sunlight needs, though most fruits require at least some full sun for the best production. Fruits that are well-suited to urban spaces include…

  • Apples
  • Blueberries
  • Bush cherries
  • Figs
  • Grapes
  • Peaches
  • pears
  • Plums
  • Raspberries
  • Strawberries

The exact fruits that will do well in your space will vary depending on your gardening zone and climate conditions. Pay particular attention to the number of chill hours fruits may need in order to produce, as this is critical to ensure a good harvest. Depending on the type of plant and its needs, you may even be able to move your gardening efforts indoors and cultivate some fruit plants without any outdoor gardening space at all!

Tips for Urban Garden Fruits

There are different ways to ensure your fruit plants, bushes, trees, and vines thrive in your unique space. To encourage the best growth and healthiest plants…

  • Choose plant cultivars that are self-pollinating and don’t require multiple plants in order to produce fruit.
  • Opt for berry cultivars that are everbearing or repeat-bearing to extend the harvest and get the most fruit from the fewest plants.
  • Provide adequate support with trellises, arbors, pergolas, or other structures that are sturdy enough to handle the mature plants’ size and the fruits’ weight.
  • Create layers of gardening space by using hanging pots and vertical structures that will give you even more room for planting.
  • Use plant stands on casters so you are able to move sun-loving plants around to take advantage of shifting light angles and maximize the plants’ productivity.
  • Choose dwarf or super-dwarf tree varieties that will not only thrive in smaller spaces but will also produce fruit when younger, so your first harvest is not delayed.
  • Dwarf fruit trees are perfect for espalier against a sunny wall.
  • Take steps to encourage bees and hummingbirds in your garden to aid pollination and keep your plants productive.
  • Use netting, reflectors, or other tactics to discourage birds that may raid your harvest even before the fruit has fully ripened.
  • Be alert for pests that may threaten your plants’ health and productivity, as they can find their way into any garden space – even indoors.

Growing fruit in the urban garden can be a tasty and enjoyable pastime, so long as you opt for fruits that will do best with the resources your space provides. By making the most of your space, you’ll easily have a fruitful harvest for all your favorite fresh fruits, homemade jams, preserves, sweet salads, baked goods, and other treats.

Fruit for Urban Garden

Fruit for Urban Garden

Fruit for Urban Garden

Fruit for Urban Garden

Indoor Succulent Container Garden

Have you noticed how a container garden can really jazz up a front entryway or sunny room in your home? Perhaps you’ve thought twice about including this addition to your plantscaping because you just don’t have time every day to water.

Cheer up! You can plant a container with succulents (plants with fleshy or thickened leaves, stems or roots) and you will not have to worry about watering frequently. Succulent container gardens are relatively carefree, and they’re so easy that you don’t have to limit yourself to just one. If one container makes a statement, several will create a conversation!

Indoor Succulent Container Garden Tips and Tricks

To have the greatest success with your new succulent container garden, consider…

  • Exposure
    Full sun is a must for all succulents and will help show off their subtle colors and textures. If your viewing location has less than adequate sun, place your succulent garden in a full sun area for the majority of the day and move to your desired location when you have company or time to enjoy it yourself. Remember to move it back out into the sun when company leaves.
  • Containers
    Because succulents do not have extensive root systems, your chosen containers may be shallow. Too much soil can hold excessive water causing the succulent’s roots to rot. Perhaps a strawberry pot would make the perfect focal point just inside your front door or on a coffee table.
  • Height
    Think about varying the heights of your containers. Perhaps your containers will require a pedestal or something else for elevation. This could be an inverted pot, a table, shelf or even pot feet. You may even consider hanging your container for elevated elegance. Whatever you choose, it’s important to remember succulents require excellent drainage. Therefore, the containers must have holes.
  • Soil
    All succulents need fast draining soil. Pre-mixed soil is available that is specifically blended for succulent container plantings. You may also use a general all-purpose potting mix and add perlite, coir or sand to increase the drainage sufficiently. We recommend Fertilome Succulent Soil.

Plants for Your Succulent Container Garden

When making your plant selection, it is fun to let your imagination go wild and embrace the full range of amazing succulents available. As a good container gardening rule of thumb, Use a thriller (something stunning to catch the eye), a filler (a sturdy, reliable choice to fill in bare spots) and a spiller (a trailing plant to blur the container edges) and you’ll never go wrong.

Succulents come in an extensive variety of colors, striking shapes and varying sizes. As when planting any container, evaluate plant color, texture and shape when making your selections. You may feel overwhelmed when choosing your plants. If you can’t decide, here is a simple “recipe” for planting one 16″ container to be seen from all sides. Maybe it will give you some ideas:

  • 1-thriller (Euphorbia tirucalliSticks on Fire‘) planted in the middle.
  • 3-fillers (Kalanchoe blossfeldiana) to surround the thriller and provide texture or color contrast
  • 5-spillers (Sempervivum arachnoideum) to drape over the container’s edge.

As an extra bonus, many succulents bloom, adding extra unexpected beauty. Blooms can be few and far between, however, but they will be exciting and rewarding when they are spotted.

The Importance of Topdressing

After planting, gently brush off any residual soil from the succulents’ leaves. Add more interest by topdressing the container. This is a layer of material will give your container garden a finished appearance. Desert type plants look great with a thin layer of light tan-colored gravel or red lava rocks. Create sparkle with sea-glass toppings or add a clean, contemporary look to Zen-like or Asian inspired plantings with smooth black river stones. Other popular top dressings include glass marbles, colored aquarium gravel or tiny seashells. You might even add a fairy garden surprise in the container, such as a miniature hut, hidden gnome or other quaint character who will call your succulent garden home.

Most importantly, have fun!

Suculent

Suculent

Suculent

Spider Mites

Spider mites are one of the most common pests in landscapes and gardens and feed on many fruit trees, vines, berries, vegetables and ornamental plants, as well as houseplants. These tiny mites are just large enough to be seen with the naked eye, but may just look like tiny, moving dots. For tiny creatures, they can do considerable damage to plants if left unchecked.

How Spider Mites Hurt Plants

Spider mites cause damage by sucking cell fluids from plant leaves. A small number of mites usually isn’t a reason for concern, but plants can sustain heavy damage if populations are high and the infestation spreads. You may notice a stippling of light or yellowish spots on affected leaves and often the webbing of mites can be seen on leaves and stems. As the damage continues, leaves may turn completely yellow, dry up and fall off the plant.

Controlling Spider Mites

Spider mites reproduce rapidly in hot, dry weather, therefore, keeping plants well watered is a good deterrent to heavy infestations. There are also many natural enemies to these pernicious bugs, such as lacewing larvae and some lady beetles that help to keep mite populations under control. Cultivating these helpful insects may be all that is necessary to minimize spider mite activity unless the infestation has already increased and spread.

Because spider mites are too tiny to pick off infected plants, judicious pruning or trimming of infested plants can help remove these pests. In heavy infestations, it may be necessary to discard an entire plant to take the mites with it. Do not put these clippings or removed plants in compost piles, however, or the mites will continue to thrive and will return to healthier plants.

At times, it may be necessary to use chemicals to deter spider mites. Be careful when using broad spectrum insecticides, however, as these will kill any beneficial insects as well as the spider mites, which can disrupt the delicate balance of a garden’s ecology. Simply spraying plant leaves with a blast of water, taking care to spray the undersides as well, can help to reduce mite populations by physically removing the spider mites. Insecticidal soaps and neem oil are also good choices when dealing with spider mites.

Once the mites have been removed, damaged plants may look bedraggled, but they will generally recover within a season or two, especially if the pests were recognized and treated quickly. Don’t let spider mites catch you in their webs – get rid of them today!

Spider Mites