Author Archives: Dammann's Garden Center

Rose Care Basics

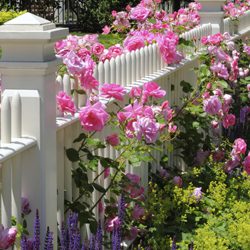
Beginners often become confused with the many recommendations and suggestions for growing roses. However, it is important to start with the basic guidelines for successful rose growing. Roses can thrive under many conditions, but they are sure to grow better, with more luxurious blooms and fewer problems, when you follow the basics.

Prepare the Soil

The proper soil is essential to nourish roses so they can grow to their full potential. To make the soil ideal for roses…

  1. Take a soil sample to test the pH, either with a home testing kit or through your local extension service. Roses like a pH of 6.0 to 6.8. You may need to add lime to raise the pH or sulfur to lower it to the optimum rose range.
  2. Incorporate composted cow manure or other healthy compost into the soil. This will provide superior drainage and excellent organic material for roses to absorb.
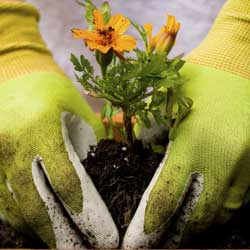
Planting Roses
If they aren’t planted properly, roses won’t thrive as well as they could. Improper planting could even damage roots and destroy a rose bush.

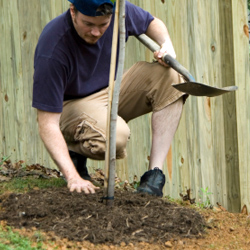
  1. Select a sunny spot with good soil drainage – roses require at least 6 hours of full sun daily. Early morning sun is preferred because it dries the leaves, which helps prevent disease.
  2. Dig a wide, shallow hole that is 2-3 times as wide but not quite as deep as the root ball (about 1 inch shallower). The plant should sit on solid ground so it doesn’t sink when the soil settles.
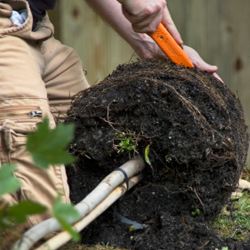
  3. Remove the plant from the pot and loosen any circling roots. If you can’t pull the roots apart, use a knife to make 4-5 vertical cuts in the root ball. This will allow new roots to grow out into the surrounding soil as the plant becomes established.
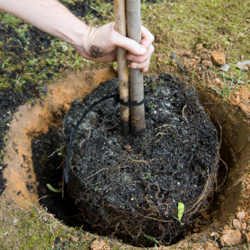
  4. Place the plant in the hole slightly elevated above ground level. Backfill with soil until the hole is half full.
  5. Soak the root ball with a mixture of a Root Stimulator & Transplanting Solution.
  6. Fill the rest of the hole with soil and water thoroughly. Apply mulch to a depth of 2 inches, being careful not to mound mulch against the trunk of the plant, which could encourage rotting or insect damage.
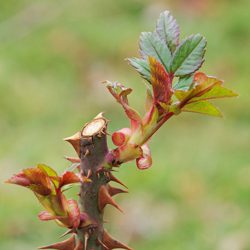
Pruning Roses

To look their best, roses must be properly pruned. This can be intimidating for rose-growing novices, but once the basics are mastered, the techniques for pruning roses are not difficult.

  1. In spring, remove winter mulch when new grow appears. Prune out all dead wood and twiggy growth and cut back to sound wood with a clean slanting cut, just above a good bud eye.
  2. During the growing season, remove fading roses promptly, cutting just above a five-leaflet leaf. This will help encourage reblooming on many cultivars, and will help prevent rot or disease infestation.
  3. To winterize, remove all fallen leaves and debris from the base of the plant, cut back to 10-12 inches after the ground freezes, then apply a mound of mulch over the canes to protect them from temperature shock. 

Food and Water

Roses need the proper nutrition – water and fertilizer – to bloom well and develop stunning colors and fragrances.

  1. Roses thrive best when given 1 inch of water weekly. A thorough soaking from rain or hose will keep roses blooming all season. Try not to overhead water unless it is early in the day, as the damp leaves can promote disease.
  2. Fertilize monthly with Espoma Rose-Tone or Fertilome Rose & Flower Food similar products specially formulated for the nutritional needs of roses.

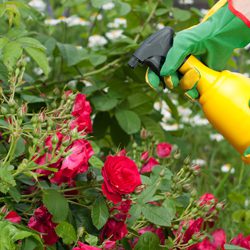
Treat for Disease and Pests

There are times when roses will succumb to diseases and pests. Quickly recognizing these problems and treating them properly will help minimize outbreaks that can damage several rose plants at once.

  1. Fungus diseases cannot be cured, so a regular spraying schedule is very important. Keep an eye on plants that were infected last year and spray with a fungicide to prevent outbreaks this year.
  2. You may also need to use an insecticide for severe insect problems. Minor problems can be handled with less harsh methods, but diligence will be necessary to keep pests from taking over the rose bushes.
  3. Many rose lovers find it convenient to use an all-purpose insect and disease spray once a week or a systemic control every 6 weeks.

It may seem like a lot of work to cultivate roses, but when you wander through your rose garden or see your favorite rose bush in full bloom, that effort will be well rewarded.

Check out our Rose List and stop by to take yours home!


Growing Mint in Your Herb Garden

Many of us love mint. With many different flavors of mint available at garden centers, it is easy to want to plant one of each. Planning ahead makes this possible to do, but lack of planning may have you tearing them all out.

How Mint Grows

Mint grows as a groundcover. The underground runners spread quickly and are difficult to remove if containment is desired. In other words, mint is often considered invasive and can quickly take over flowerbeds, vegetable plots and even areas of turf near where it is originally planted. Planting in pots placed into the ground prevents its escape, or intensive labor may be needed to help get mint back to its original proportions after it has wandered.

Planting Mint

To help keep mint under control and more accessible for use, many gardeners opt to plant it indoors. Attractive in barrels or pots by the kitchen, mint leaves and flowers can be easily available for cooking or beverages.

To prevent plants from looking rangy, frequently cut or pinch back new growth. Pinching off the flower buds produces more lush leaves and fuller plants.

Mints grow well in sun or part shade, preferring well-drained but moist soil. Although not particular about soil type, enriching clay soil with compost will improve the overall plant appearance and taste. Different soil pH values and organic compositions may also have some minor influence on the taste of different mints.

Most mints grow 18-30 inches tall. Plant at least 2 inches apart to prevent cross-pollination of different varieties and preserve the best flavors. As a perennial, the plant may disappear in the winter, but will return in spring, hardier and more vigorous than ever.

Using Mint

It’s no surprise that mint is an edible favorite. Not only is it popular for refreshing drinks such as mint juleps or mint-infused lemonade, but it is also ideal for…

  • Sauces
  • Salads, especially fruit salad
  • Flavoring for cookies, cakes and puddings
  • Jellies and preserves
  • Smoothies
  • Soups and stews
  • Ice cream, gelato and frozen yogurt
  • Garnishes on meats
  • Freezing in ice cubes for a drink garnish

Mint can be used fresh for a strong, vibrant taste, or it can easily be dried and used all year long. Both fresh and dried mint sprigs can also be fragrant additions to cut flower arrangements, wreaths or other greenery decorations as well. With so many wonderful options for mint, you’ll want to add some to freshen up your herb garden today!

General Soil Amendments

We’ve all heard of the importance of amending the soil properly for gardening and landscaping, but the number of soil amendments sold in garden centers often confuses gardeners. Which is which, and which will work best for your soil conditioning needs?

Types of Soil Amendments

Soil amendments fall into two basic categories, inorganic and organic. Inorganic amendments come from non-living materials such as sand, perlite, vermiculite and crushed stone. With the exception of limestone and gypsum, which are used to increase soil calcium, these are not commonly used in the garden.

However, organic amendments are the opposite. They come from previously living materials such as peat, manures and composts. When leaves, bark, peat, animals and animal wastes are mixed together to decompose, compost or “humus” is the final product. Very commonly used, these materials enrich the soil by increasing the air spaces, adding extra nutrients to the soil, improving the absorption of those nutrients and increasing overall soil fertility.

Why You Need Soil Amendments

Excellent soil is not common around most homes. Even if it was initially, house construction and roadwork often removes the good soil and construction equipment compacts the remaining soil. Furthermore, heavy use of the remaining turf – children and pets playing, for example – continues to compact the soil. Chemical treatments, runoff from gutters and downspouts, removal of existing plants, changes in local wildlife – all of these factors can wreak havoc on soil.

Adding organics loosens compacted soil and results in better gardens. Incorporate organics into the beds throughout the year by working evergreen needles, leaves and lawn clippings into the soil. Amendments such as peat or lime can improve a pH problem, if one exists. Calcium and magnesium deficiencies can be corrected using organic materials such as bone meal or wood ashes, or inorganic materials such as limestone, gypsum or soft rock phosphate.

Mulching is another simple way to add biodegradable materials to the soil. Simply place mulch around the plant, leaving several inches bare closest to the stem to discourage insect invasions and rot. In addition to slowly providing nutrients as it decomposes, mulching is attractive, reduces weeds and erosion, maintains soil temperature and prevents “crusting” that occurs when soil becomes too dry.

Another advantage of adding organics is the attraction of worms. They further assist in the decomposition, increase aeration and leave worm castings, a valuable organic material, behind. A healthy garden is home to many worms, and it all starts with adding organic soil amendments.

Whether you opt for organic or inorganic soil amendments, if you use them properly, you soil will improve and your landscaping, flowerbeds and garden will look better than ever.

Why Is Deadheading Your Flowers Important?

Deadheading should be a regular garden task to maintain beautiful blooms, but why? What is the purpose of deadheading, how does it affect flowering plants, and how can you do it more effectively to make the most of every bloom?

About Deadheading

Deadheading is simply the process of removing faded, wilted, browning, or dead flowers from annuals or perennials before seeds are produced. Depending on the size of the flower and its type of stem, deadheading can be done by gently pinching back stems, snapping off the blooms, plucking off spent flowers, or cutting the stems with sharp snippers or pruners.

Why You Need to Deadhead Your Flowers

When you remove wilted blooms, you immediately improve the appearance of your shrubs and flowering plants by leaving only the best, most colorful, richest flowers to enjoy, and fallen petals will not spread rot or fungus to the plant’s lower leaves. Deadheading can also help your plants keep a tidy shape and will encourage fuller foliage. Removing dead flowers also lengthens the bloom time by forcing the plant to produce more flowers, and because dead blossoms are removed before they go to seed, you avoid unwanted seedlings taking over the lawn or flowerbed.

Deadheading also helps wildlife, as many butterflies and hummingbirds thrive on the nectar from boldly blooming flowers, so a longer bloom time and extra flowers will attract more of these colorful visitors to your yard. Extra blooming can also bring more color to your landscape later in summer and even into autumn for even more interest in your yard and landscape.

Some of the more familiar and widespread flowers that benefit from deadheading include…

  • Bee balm
  • Begonia
  • Columbine
  • Geranium
  • Lavender
  • Petunia
  • Rose
  • Salvia
  • Yarrow

Ask your garden center experts about the need to deadhead other types of flowers, including which deadheading techniques that can best benefit each plant.

How Deadheading Affects Plants

The visual affects of deadheading are immediate, but just how does deadheading impact each plant? As blooms begin to fade, plants focus their energy and growth on seed production rather than new blooms. When the blooms that are past their prime are removed through deadheading, however, the plant is effectively tricked into creating more blooms, thus increasing the overall bloom season. This is particularly important for annuals, as they only live for one growing season, so it is best to extend that bloom time for as long as possible. Furthermore, annual seeds are often unnecessary, as the plants will generally be replaced in the landscape the next spring. With perennials, deadheading has the same effect, and the process will help keep the plant’s shape and produce more prolific blooms for colorful accents.

Tips for Deadheading Your Flowers

Deadheading is an easy garden task, but it can quickly become overwhelming, particularly if you have many flowering plants to tend. Instead of letting the chore build up, consider spending a few minutes each day deadheading. That time can be a peaceful and soothing way to connect with nature without a lengthy commitment and will help keep the landscape lovely. Staggering the deadheading will also mean fewer flowers to cut away from each individual plant, minimizing the stress to the plant so it can continue to flourish. As you work, examine the plants carefully for any other signs of trouble, such as pests or diseases, so they can be taken care of right away.

When cutting away spent blooms, use the appropriate pruners or snippers to make clean, neat cuts for the least trauma to the plant. Small, clean pruners with sharp tips are a great choice, as they will more easily reach into the plant’s foliage for thorough deadheading. Keeping a small bucket or basket nearby to collect the cut blooms will make cleanup easy, and the trimmed flowers can be added to a compost pile or otherwise properly disposed of.

When cutting stems to remove wilted flowers, cut below the spent flower but above the first set of full, healthy leaves or approximately one-quarter inch above a new emerging bud. This will encourage new growth to keep the plant’s overall shape and fullness. Larger stems, such as mature rose bushes, should be cut at a 45-degree angle to minimize the risk of disease and damage to the plant.

Clean deadheading shears and pruners with rubbing alcohol, often, to minimize the risk of spreading disease, fungus, or pests between plants. Wearing gloves can protect your hands from thorns or sharp foliage, and a good garden hat is essential to protect yourself from the sun as you twist and turn to reach each wilted bloom.

After deadheading, water your plants carefully and use appropriate fertilizer regularly to nourish new growth as the plants produce even more blooms.

Deadheading is an easy garden chore, one that can be a tranquil time to tend your landscape or a great opportunity to involve children in essential tasks. By understanding how deadheading improves your plants and adds even more color to your landscape, you will happily take care of this task and enjoy the benefits it brings to every blooming plant.

Late Spring Gardener’s Calendar

Turn over your vegetable garden and add humus, mushroom compost or manure to enrich the soil.  Apply Bonide Fruit Tree Spray as buds swell and again at petal drop to all fruit trees.

Fertilize perennials with Dr. Earth Rose & Flower Fertilizer.

Continue spring cleanup.  Completely remove winter mulch.  Cultivate to remove winter weeds and debris from the planting beds, then edge.  Prepare your annual beds, and mulch landscape beds with shredded mulch, bark chips or gravel.   Apply Preen or Corn Gluten and scratch it in to prevent future weeds, or try the new Preen Mulch Plus which combines mulch and Preen and prevents weeds for up to 6 months.

Plant and transplant trees and shrubs, including roses, ground covers, and perennials (including hardy lilies and lily-of-the-valley).

Seed or sod new lawns.  Reseed bare spots in established lawns.  Keep the area moist until seedlings appear, then mow when the new grass is 3” high.

Put down a second application of Team or Tupersan (newly seeded lawns) for pre-emergent goosegrass control and control of crabgrass the rest of the year.

Transplant cool-season seedlings into the garden.  When the soil temperature reaches 60 degrees, sow warm- and cool-season vegetable and herb seeds.

Dig and divide crowded spring bulbs after they have finished blooming. Enrich the soil with compost, manure or Espoma Bulb-Tone.

Prune forsythia and other spring-flowering trees and shrubs after the flowers fall.

Place gro-thru sets and link stakes over or around peonies, grasses or any other perennials in need of support.

Check arborvitae, cedar, juniper spruce and pine for bagworms.  Hand-pick bags from the host and spray with Ortho Systemic Insecticide.

Begin summer rose care program of deadheading, spraying and watering.

Fertilize roses with Bayer All In One Rose and Flower Care or Dr Earth Rose and Flower Fertilizer, azaleas with Espoma Holly-Tone or Dr Earth Azalea/Camelia Fertilizer, and fruit trees with Dr Earth Tomato and Vegetable Fertilizer.

Deadhead bulbs, but leave foliage to mature and yellow before removing.  This will help nourish the bulb for next year’s flowering. Fertilize with Dr Earth Bulb Fertilizer.

Prune new growth on needled evergreens.

Dig and divide early blooming perennials after flowering.

Apply Encap Fast Acting Iron Plus or Bonide Liquid Iron Plus to azaleas, hollies, junipers, laurel, pines, rhododendron and spruce to provide iron for chlorophyll production by foliage.

Fertilize container plants and window boxes weekly with a Master Nursery Bud and Bloom Plant Food, or use Dynamite All Purpose Plant Food for season-long feeding, to promote healthy, vigorous plants all summer.

Pay close attention to the watering needs of these plants as well as hanging baskets, because they tend to dry out quickly on hot summer days.

Check plants for spider mite damage and treat with Bayer 3 in 1 Insect, Disease and Mite Control then alternate every 7-10 days with Bonide All-Season Oil Spray.

Rock Gardens

Rock gardens can be amazing options for challenging spaces in your landscape, whether your yard has poor soil, narrow sections, steep terraces, deep shade or other concerns. You can even design a rock garden anywhere just to enjoy their elegant lines, varied texture and easy care. But how do you put in a rock garden?

What Is a Rock Garden?

A rock garden is much more than just a pile of rocks, but of course rocks are the key component of this type of landscaping. Using different colors, shapes and textures from gravel and river rocks to flagstones, pavers and boulders will add dimension and variety to any rock garden. These unique gardens also often include rock-loving plants, a water feature or a design to mimic dry water, unexpected blooms and interesting accessories. Sizes can also vary, from simple containers or corner accents to a full landscaping bed or even an entire yard. While rocks may be a key feature of a rock garden, this type of garden can truly be anything you like!

Designing a Rock Garden

Rock gardens can be very flexible and you can create any type of rock garden you envision, but following some basic steps will give your garden a cohesive, amazing design you will love for years.

  1. Choose the Location
    In many cases, your yard will choose the location for your rock garden based on where you may have difficulty growing other plants or flowers, or where sunlight levels aren’t ideal for vigorous plants. Don’t be afraid to choose any location you’d like to see interesting rocks, however, including planning a rock garden around a pergola, gazebo or meditation space such as a favorite bench or simple pond.
  2. Lay Out the Garden Shape
    When planning a rock garden, use a hose, planter stakes or flexible edging to outline the garden space. This will help you visualize where to put the primary rocks and plants, and you can easily adjust your outline to find the perfect shape for your rock garden. You can consider natural curves and flowing lines, or you might prefer a more geometric shape for a visual pop in your landscape.
  3. Clear the Garden Space
    If the area for your new rock garden isn’t already bare, you will need to clear out existing plants and grass to make way for your new design. Opt for sharp tools designed for cutting sod and digging up root systems to be sure you are able to clear plants effectively. Putting down a layer of weed barrier fabric is a good idea to keep growth from recurring so your rock garden remains crisp and clean, reducing the need to weed.
  4. Install Rocks
    Take your time installing different rocks in your garden, starting with the largest boulders or heavier rocks and carefully positioning them just where you want to see them, checking from different angles to be sure they offer the most pleasing view. You can even create patterns with rocks, such as using different rock shapes or colors to create a spiral or labyrinth, initials or fun features such as flowers, waves or complete scenes. Think vertically as well, stacking rocks to create a cairn or arch, or opt for fun mimicry such as using different rock sizes and colors to create a dry “creek” bed in your rock garden.
  5. Add Plants
    Plants will be part of your rock garden, add them after you’ve designed the rocky spaces, and filling around these rocks with soil. Most plants can be part of a rock garden, however, drought tolerant plant that grow in well-drained, low-fertility soil are the best choices. Flowering bulbs, evergreens and ornamental grasses are popular choices, and you might include mounds of graceful groundcovers or even interesting mosses – depending on the amount of sun you receive. Keeping the chosen plants ultimate size in mind when planning is also essential to a well-designed rock garden. Make sure that the plants with stay in scale with the size garden you have created. Always when selecting plants, consider the light level of your garden as well as the soil quality and moisture levels to be sure the plants will thrive alongside your rocks.
  6. Fill Bare Spaces
    Because rocks don’t grow, they won’t gradually get larger to fill in bare spaces in a rock garden. Instead, you can fill in those spaces yourself with additional gravel or pretty pebbles, mulch or smaller ground covers. Leave enough room for any plants in the garden to grow to their mature size, but feel free to fill in the extra spaces with additional color and texture.
  7. Accessorize Your Garden
    Adding accessories, accents and decorations to your rock garden is a lot of fun, and helps add more color and character to the design. Consider a colorful gazing ball, bird bath, meditation bench, statue, fountain or other interesting element. Containers of flowers can be beautiful additions, or you might want to position solar stakes or other landscape lighting that will show off the drama of your rock garden after the sun goes down.

A rock garden is a fun chance to be creative in your landscape, and it can be a great way to show off your personality in unique and interesting ways. Rock on!

Milkweed and Monarchs

In nature, few relationships are as intricate and essential as that between the Monarch butterfly and the milkweed plant. Famous for being the most recognized insect in the US, these vibrant winged beauties rely on milkweed not only for sustenance but for their very survival. Sharing this fascinating relationship between Monarchs and milkweed with you, we’ll explore how this plant supports every stage of the butterfly’s life cycle.

Birthplace and Sanctuary:
Milkweed, genus Asclepias, serves as the cradle of life for Monarch butterflies. Female Monarchs lay their eggs exclusively on milkweed plants, offering them a safe haven as they undergo their transformation from egg to caterpillar to chrysalis to butterfly.

Caterpillar Cuisine:
Once the Monarch eggs hatch, the tiny caterpillars feast voraciously on milkweed leaves. These particular leaves provide the essential nutrients needed for the caterpillars to grow rapidly. As they munch on the leaves, they accumulate toxins from the milkweed sap, making them distasteful and even poisonous to potential predators. This unique adaptation is crucial for the survival of Monarch caterpillars in the wild.

Metamorphosis Station:
As the caterpillars mature, they undergo a miraculous transformation within their chrysalis, emerging as fully-formed adult butterflies. Milkweed habitats provide the ideal environment for this metamorphosis to occur. Not only is milkweed the favored source of food, but the structure of milkweed plants, with their sturdy stems and broad leaves, offers ample space for Monarch chrysalises to hang securely until the butterflies emerge.

Fueling the Journey:
During their remarkable migration journeys, Monarch butterflies rely on milkweed for sustenance. Nectar from milkweed flowers serves as a vital energy source, fueling their long flights across continents. As they journey thousands of miles from their breeding grounds to overwintering sites and back again, Monarchs depend on the abundance of milkweed along their migratory routes.

Conservation Connection:
The decline of milkweed habitats poses a significant threat to Monarch populations. Factors such as habitat loss, pesticide use, and climate change have led to a decline in milkweed availability across North America. Efforts to conserve and restore milkweed habitats are essential for ensuring the survival of Monarch butterflies. By planting milkweed in home gardens, individuals can contribute to the preservation of this vital butterfly species. Selecting the appropriate milkweed species is crucial for attracting Monarchs. While there are over 100 species of milkweed native to North America, some varieties are particularly favored by Monarchs, and many are region-specific.

Milkweed Species for Northeast and Midwest

In the Mid-Atlantic States, there are several native milkweed species that are crucial for Monarch Butterflies. Here are some of them, along with their details:

Common Milkweed (A. syriaca)
Common milkweed is perhaps the most well-known milkweed species.

It typically grows in tall clusters and produces pink to purplish flowers. It is most often found in a variety of habitats, including fields, meadows, and roadsides.

Swamp Milkweed (A. incarnata)
As the name suggests, swamp milkweed is often found in wetter habitats like marshes, wet meadows, and along stream banks. It has clusters of pink to mauve flowers. Swamp milkweed is an excellent choice for wetter areas where other milkweed species might not thrive.

Butterfly Weed (A. tuberosa)
Butterfly weed is known for its vibrant orange flowers and is a favorite among gardeners. It prefers well-drained soil and is often found in dry fields, along roadsides, and in open woods. While it’s not as commonly used by Monarch larvae as some other milkweed species, it’s still an important nectar source for adult butterflies.

Poke Milkweed (A. exaltata)
This milkweed species has tall, slender stems and delicate, pale pink flowers. It’s typically found in shaded woodlands and along forest edges. While it’s not as widespread as some other milkweed species, it’s still an important host plant for Monarch caterpillars where it occurs.

Whorled Milkweed (A. verticillata)
Whorled milkweed is characterized by its narrow leaves and small clusters of white flowers. It’s found in a variety of habitats, including dry fields, open woods, and roadsides. While it may not be as common as some other milkweed species, it’s still valuable for Monarch butterflies, particularly in areas where other milkweeds may not grow as well.

These native milkweed species will not only provide an essential habitat for Monarch Butterflies but also support other native pollinators in your area. Make sure to choose species that are appropriate for your specific region and growing conditions.

Cultivating Milkweed for Butterfly Abundance
Are you ready to invite the mesmerizing beauty of Monarch butterflies into your garden? Cultivating milkweed isn’t just about growing a plant; it’s about fostering an ecosystem, supporting biodiversity, and witnessing the awe-inspiring journey of one of nature’s most iconic creatures – the Monarch butterfly.

Now that you’ve chosen your milkweed varieties, it’s time to roll up your sleeves and get gardening! Here’s a general step-by-step guide to growing milkweed in the garden to create a haven for Monarchs.

  1. Site Selection
    Choose a sunny spot in your garden with well-drained soil. Although some exceptions exist, most milkweed plants prefer full sun but can tolerate partial shade.
  2. Soil Preparation
    Milkweed isn’t overly picky about soil type but does prefer soil that’s not too compacted. Loosen the soil to a depth of about 6 inches and amend with compost if necessary.
  3. Planting
    Sow milkweed seeds directly in the ground in early spring after the danger of frost has passed. If you prefer to start with seedlings, transplant them into your garden with plenty of space between plants to accommodate their mature size.
  4. Watering
    Keep the soil consistently moist but not waterlogged, especially during the plant’s early growth stages. Once established, milkweed is relatively drought-tolerant.
  5. Maintenance
    Milkweed is generally low-maintenance, but removing weeds around young plants can help them thrive. Deadheading spent flowers can encourage continuous blooming and prevent self-seeding if desired.
  6. Ongoing Support
    Embrace the biodiversity that milkweed attracts by avoiding the use of pesticides and herbicides in your garden. Encourage beneficial insects and pollinators to make themselves at home alongside your Monarchs.

As your milkweed garden flourishes, so too will the population of Monarch butterflies that grace your outdoor oasis. By cultivating milkweed, you’re not just growing a plant – you’re fostering a connection to nature, supporting wildlife conservation efforts, and creating a sanctuary for Monarchs to thrive. So, roll out the floral welcome mat and prepare to be enchanted by the majestic beauty of Monarch butterflies in your own backyard.

Rose – Queen of the Garden

We all love roses. It may be the luxurious fragrances, rich colors or the elegant flower forms that attract us. It may be the memories that roses evoke. Whatever the reason, roses are one of the world’s most popular flowers. With so many different types of roses available, ranging from the diminutive miniatures to the towering climbers, there is no excuse to exclude this “Queen of Flowers” from your garden.

Rose Types

There are many types of roses to cultivate, and it can be difficult to choose. If you’re just getting started with roses, consider some of these popular favorites…

  • Hybrid Tea Roses: These blooms are a favorite of rose gardeners who enjoy long-stemmed, large flowers. Hybrid tea flowers have many petals and plants grow upright and tall, about 3-7 feet. These roses are appropriate in either a formal garden or informal planting.
  • Floribunda Roses: These roses have smaller flowers than hybrid teas with the flowers arranged in clusters. This rose bush is useful as a hedge for a border or privacy screen, and is equally stunning in mass plantings.
  • Grandiflora Roses: These beauties were developed by crossing hybrid teas with floribundas. This rose grows to around 10 feet tall so it should be used in the back of the border where its beauty won’t shroud other plants. The flowers of the Grandiflora are hybrid tea form and can be single stemmed or borne in clusters depending on the cultivar.
  • Climbing Roses: These roses make an outstanding vertical display when trained on arbors, walls, fences, trellises and pergolas and can grow from 8-15 feet tall. Flowers may be borne large and single or small and arranged in clusters.
  • Miniature Roses: These delicate nymphs are dwarf in every way – flowers, leaves and height. This rose may be mass planted as a ground cover, used as border or grown in containers on decks, patios and porches.
  • Shrub Roses: These flowers are renowned for their bushy habit and superior disease resistance making them an excellent choice for mass planting. The shrub rose flower may be either single or double. Some types have very showy rose hips.
  • Old Roses: These luscious heirlooms are making a come-back! Although bloom times and color choices are limited, old roses are much more fragrant, vigorous and disease resistant than modern roses. To obtain all the qualities of an old rose combined with a long bloom time of a modern rose, look for the David Austin varieties.

Not sure which rose is just right for your landscape or garden? Our rose experts will be glad to help you choose the perfect rose no matter what thoughts or emotions you want your garden to evoke. Stop in today to see the latest types of roses and the most popular cultivars for this year’s gardening.

roses_3

roses_8

roses_1

Planting Basics – Trees & Shrubs

Are you ready to add trees and shrubs to your landscape? Of course, we can do the planting for you. But if you’d like to do it yourself, here’s what you need to know:

Soil Preparation

How quickly and how well trees become established once they are planted is affected by the amount of stress they are exposed to before and during planting. Minimizing planting stress is the goal of proper planting. Trees and shrubs should also be thoroughly watered prior to planting to minimize water stress.

Ideally, soil preparation should be carried out well ahead of planting. Preparation could include incorporating organic matter into the soil to improve aeration, assist drainage of compacted soils and improve soil nutrient-holding capacity. Specific preparation may be needed if the soil has an inappropriate pH or is lacking in certain elements. Trees and shrubs with a limited soil tolerance range may require very specific soil preparation to meet their requirements.

You can also use a tree and shrub soil like Lambert Trees & Shrubs Planting Mix, which is a pH adjusted-compost that loosens the soil and contains peat that maintains ventilation for root growth.

Dig the planting hole 2-3 times wide than the root ball, but only as deep as the root ball. Prepare soil by mixing a one-to-one ratio of your backfill soil with the tree and shrub mix.

Planting Container-Grown Trees & Shrubs

When you buy a plant from a garden center or nursery, it may come in a small pot that holds the roots. Remove the plant from that container gently, but without pulling on delicate stems or foliage. Squeezing the container all around can help loosen the root ball so it slides out more easily, or the container may be thin enough to cut away.

Because the plant was grown in a container, its roots have been restricted by the shape of the container. Loosen the roots all the way around, even on the bottom. If the root system is too tight to loosen with your fingers, cut through roots slightly with a knife or pruning sheers. Make three or four one-inch deep cuts, then gently pull the roots apart.

Center the plant in the prepared hole, keeping it 1-3 inches above grade. Keep roots spread out.

Planting Field-Grown Trees & Shrubs

If you are transplanting a tree or shrub that has been field grown, it may have bare roots or be lightly bagged or burlapped. Center the plant in the prepared hole 1-3 inches above the grade. Cut and remove all cords or twine from the root ball and trunk. Burlap should be left on, but loosened and pulled away from the trunk and below the soil surface. Remember to move trees carefully. Roll the root ball on its side and “steer” it into the hole with the trunk. Straighten the tree upright in the hole, checking it from different angles to be sure it is fully upright.

Completing the Planting

For both container-grown and balled and burlapped plant material, backfill the planting hole with soil your mix and pack firmly. Make a rim of soil around the plant to act as a “saucer” for holding water.

Water thoroughly with a slow soaking, and use a root stimulator fertilizer like Fertilome Root Stimulator & Plant Starter Solution to provide good initial stimulus for the roots to spread out.

Apply a 2-inch layer of mulch around your new planting, keeping an open space of 3 inches around the trunk or base of the plant to allow for air circulation.

Staking Container & Field Grown Trees and Shrubs

When larger trees or shrubs are planted, they are not yet firmly established in their new locations and may tip or lean as the soil settles. For larger trees, use three wires secured to anchor stakes in firm ground (never into the root ball). Where the wires touch the tree, they should be covered with rubber hose to prevent damage. Remove stakes as soon as roots become established. This can be as soon as a few months, so check your tree frequently. Stakes should not be left in place any longer than one growing season.

New Plant Care

All newly planted trees and shrubs need gentle care as they settle in to their new locations. To keep them healthy and encourage good initial growth…

  • Water Properly
    Plants should be slowly soaked to a depth of 4 inches, which is the equivalent of about an inch of water per week. This is necessary during the first year or two. Let the hose run slowly at the base of the plant until the water has penetrated to the root depth. Too much water can also be a problem. Feel the soil. If it is soggy or squishy, do not add water. Frequent light watering is not as good as a thorough soaking once per week, which will encourage strong root growth.
  • Fertilize Appropriately
    Your new plants should be given a root stimulator type fertilizer right after planting, like Fertilome Root Stimulator. You should not use a fertilizer meant for mature plants on new material, as it could cause damage to your plant. It is essential for new plants to develop a healthy root system – top growth will follow. After the first season, regular fertilizers can be used.
  • Prune Safely
    Pruning at planting time may be necessary for larger trees to reduce leaf surface to match cut roots. Remove one-third of smaller twigs. Do not cut back the main trunk or larger branches. If shaping is necessary, trim side branches enough to get uniformity.
  • Be Alert for Insects and Diseases
    Keep an eye out for holes or brown leaves or needles. This could be a sign of insect or disease problems. Ask our staff for help identifying the insect or disease and to prescribe appropriate treatments.
  • Special Care Plants
    Some plants need extra special care. For example, azaleas, hollies, rhododendrons and dogwoods all need well-drained, acidic soils, high in organic matter and a shady location. Research the trees and shrubs you are planting to be sure you are meeting their needs right from the beginning.

It can seem intimidating to plant your own trees and shrubs, since they are an investment in your landscape that you hope to enjoy for many years. By understanding planting basics, however, you can easily give every plant a great start in its new home.

Time to Plant

Time to Plant

Time to Plant

Time to Plant

Try Delosperma

“Ice plants” refer to several types of plants, usually succulents with fleshy thick leaves in cool green-blue colors. However, after an introduction to Delosperma, you’ll know it as the real deal. As a group of tough groundcovers, these blooming succulents flourish in full sun in well draining soils with little water, once they are established. Plus, they’re amazingly colorful!

About Delosperma
Native to Africa, with fleshy, clustered green leaves, Delosperma species and varieties solve many common groundcover, erosion and container garden needs. From only ½” tall and a few inches wide to 4 inches tall and spreading to 2 feet wide, Delospermas begin blooming with daisy-like flowers in early spring and often continue blooming through the summer. Depending on the variety, these perennial succulents punch up the garden with bright fuchsia, red, bronze, yellow, white, lavender or orange flowers, and several variegated or two-toned blooms are available as well.

A more adventurous gardener can turn up the heat with Delosperma ‘Fire Spinner.’ It quickly grows to an attractive weed-thwarting 2 inches high and 15 inches wide mat in two seasons. The variety name perfectly describes the flowers. It’s a kaleidoscope of hot colors on unbelievable 1½” wide fiery flowers. Radiating from a clear white center, petals with deep magenta color in the middle transition to hot orange, finishing with bronze on the outer tips. These arresting flowers sit atop shiny, apple-green needle-like succulent leaves making an astonishing garden statement from late spring through fall. What an unexpected showstopper!

What Delosperma Demands
Most gardeners are all too used to the finicky habits of their favorite plants, from precise soil pH levels to a specified amount of sunlight to a unique cocktail of soil fertilization and amendments for the best growth. Not so with Delosperma – all these plants ask (it’s more of a demand, really) is good drainage. With that, they’re fairly self sufficient – easy to care for and requiring very little maintenance.

Birds, bees and butterflies love Delosperma just as much as gardeners, but deer don’t, making these plants ideal for areas where deer are a bit too friendly in the garden. They work well as borders or to soften the edges of buildings, walkways and driveways, and they’re right at home in well-drained terraces, rock gardens and xeriscaping.

Whether you live in a naturally drought-prone area or just want to conserve water without sacrificing color and beauty, give Delosperma a try and you won’t be disappointed!

delosperma-1